

 User Notice
 Forum Links
Related Threads
Coming Soon
Thread Information
Thread Actions


Order
Undertale - Ruins Pacifist Guide
01-04-16 02:00 AM
 Lexatom is Offline
| ID: 1232289 | 1465 Words
Lexatom is Offline
| ID: 1232289 | 1465 Words
 Lexatom is Offline
| ID: 1232289 | 1465 Words
Lexatom
LunarDarkness2
LunarDarkness2
Level: 126


POSTS: 1633/5106
POST EXP: 331704
LVL EXP: 22910763
CP: 26847.3
VIZ: 713846

POSTS: 1633/5106
POST EXP: 331704
LVL EXP: 22910763
CP: 26847.3
VIZ: 713846
Likes: 0 Dislikes: 0
Once you like. After that's done, you'll find your character in a dark-looking area. Once you follow the path, you will find yourself meeting the first NPC of the game, Flowey.  Flowey tells you some of the basics of the combat system. He says he's going to send some happiness pellets towards you, but in reality, they're bullets that damage you. Go ahead and get them like he said if you want, but you can also dodge them, it doesn't really matter which you choose to do., as it doesn't have any effect on the main storyline. Flowey tries to kill you, but to no avail, thanks to Toriel. Toriel is the gatekeeper to the Ruins, and she wants to take care of you. Once you follow the path again, you'll find yourself in a place known as The Ruins. Follow wherever Toriel goes. Eventually, you'll reach a room containing a training dummy. You will engage the training dummy in a battle. This is when Toriel tells you more about the unique battle system this game uses. For the Pacifist route, we are going to spare every single creature that attacks us, no matter what. You'll know that you are able to spare a creature if their name is yellow. If you kill something, then the Pacifist route automatically switches to the Neutral route, and you'll have to restart. Once the battle with the training dummy ends, continue following Toriel. Before we go any further into this guide, let me explain the enemies you might encounter in this area and how to deal with them. You can spare some of the enemies from the start of the battle, but you won't get any gold if you do this. I suggest you follow these steps when battling an enemy.  Name - Froggit Strategy - All you have to do to be able to spare Froggit is compliment him. After that, spare him.  Name - Whimsun Strategy - Terrorize Whimsun, and it'll most likely run away.  Name - Moldsmal Strategy - Imitate Moldsmal  Name - Migosp Strategy - Spare every other enemy to be able to spare Migosp  Name - Loox Strategy - Don't Pick on Loox  Name - Vegetoid Strategy - Flee After you have walked through a lot of pathways with Toriel, a cutscene will play where she says she has to go for a bit. Walk to the end of the room, and you'll find out she was just hiding behind a pillar. But this time, she tells you she actually has to run a quick errand. She gives you a cell phone because of this. Right now, you can only call Toriel on it, but it will get You will reach a room with cracked floor in front of you, just walk onto the cracked tiles. You will fall through the floor, but that's not a problem, since there are stairs at the side of the room you need to exit at. Simple. In the next room, you will find a rock. After you take a few steps, Toriel will call you and ask if you prefer butterscotch or cinnamon. Pick whichever you like more and push the rock into the white tile at the end of its pathway, and move on to the next room. In this room, you will find a ton of cracked tiles. If you fall through one of the tiles, you will be in a room with leaves scattered around the floor, and a sign on the wall that reads "please do not step on the leaves". This is hinting the solution to the puzzle. Memorize the pattern of the leaves and avoid them. Once you reach the end of that room, move on. In this room, you will find three rocks. You know what to do. The bottom rock will keep acting dumb, so just keep pushing it into its respective white tile at the end of its pathway until it stays. Move on to the next room. In the next room, you will find a save point. Be sure to save and go on to the next room to fight the first boss. You will find a ghost laying down on the leaves pretending to  Name - Napstablook Strategy - Cheer Napstablook 4 times to spare him. After you spare Napstablook, I suggest you go into the room into the right before you move onwards. You will find two spider webs that sell you healing items. I suggest buying at least 1 to skip a boss fight later in the game. Once you've done this, go into the room you saw upwards. This room has three Froggits in a row. Talk to them for tutorial information. Walk to the end of the room to move on to the next one. This next room has 6 cracked tiles in it. At the end of the room is a blockade the doesn't allow you to pass. Fall down the cracked floor tile in the top-middle. You will find a switch, flip it, and the blockade will disappear, allowing you access to the next room. By the way, the cracked floor tile in the bottom left has the Faded Ribbon item. Feel free to equip it if you'd like. This final puzzle contains three colored switches, and a sign that tells you which switch to press. Press the switch that the sign tells you to press, and move on. You will be in another room with 2 colored switches, and 1 switch hidden behind a pillar. Press the one hidden behind the pillar, then move on. This is the final room. There is one colored switch, and 2 hidden switches. What I do here is press one of the hidden switches and try my luck. Once you pressed the correct switch, move on to the next room. There is an item to the east, but it raises your attack. And since this is a Pacifist route, you don't really need it. Go up and you'll finally find Toriel again. She will invite you inside her house. Be sure to save at the save point outside her house, because you are about to face the second boss. Head inside Toriel's home. Toriel shows you your room. Go ahead and feel free to go to Toriel will be walking down the pathway, asking you to go back to your room. She also says that the exit to the Ruins is up ahead, and she is going to destroy it. She explains that every time a human falls down here, they always die. She wants to protect you. Disobey her and keep following her. You will reach the door that exits the Ruins. Be prepared to fight another boss! 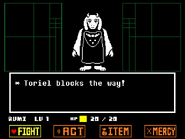 Name - Toriel Strategy - If you try and use the Act option, nothing will happen. Because of this, you will have to choose Spare over and over again until she finally gives in. Try and dodge her attacks to the best of your ability. You will know that the battle is almost over when she misses her attacks on purpose. Good luck! Once you have spared her, she will allow you to pass, but not without a goodbye hug! Also, from this point on in the game, you will not be able to talk to Toriel. Once you go through the door, you will find yourself in a similar area from when you started. Flowey will appear again, and say some words, different depending on what you did so far. After he finishes talking, go to the end of the room, and exit to find yourself in a snowy looking area.... like. After that's done, you'll find your character in a dark-looking area. Once you follow the path, you will find yourself meeting the first NPC of the game, Flowey. Flowey tells you some of the basics of the combat system. He says he's going to send some happiness pellets towards you, but in reality, they're bullets that damage you. Go ahead and get them like he said if you want, but you can also dodge them, it doesn't really matter which you choose to do., as it doesn't have any effect on the main storyline. Flowey tries to kill you, but to no avail, thanks to Toriel. Toriel is the gatekeeper to the Ruins, and she wants to take care of you. Once you follow the path again, you'll find yourself in a place known as The Ruins. Follow wherever Toriel goes. Eventually, you'll reach a room containing a training dummy. You will engage the training dummy in a battle. This is when Toriel tells you more about the unique battle system this game uses. For the Pacifist route, we are going to spare every single creature that attacks us, no matter what. You'll know that you are able to spare a creature if their name is yellow. If you kill something, then the Pacifist route automatically switches to the Neutral route, and you'll have to restart. Once the battle with the training dummy ends, continue following Toriel. Before we go any further into this guide, let me explain the enemies you might encounter in this area and how to deal with them. You can spare some of the enemies from the start of the battle, but you won't get any gold if you do this. I suggest you follow these steps when battling an enemy. Name - Froggit Strategy - All you have to do to be able to spare Froggit is compliment him. After that, spare him. Name - Whimsun Strategy - Terrorize Whimsun, and it'll most likely run away. Name - Moldsmal Strategy - Imitate Moldsmal Name - Migosp Strategy - Spare every other enemy to be able to spare Migosp Name - Loox Strategy - Don't Pick on Loox Name - Vegetoid Strategy - Flee After you have walked through a lot of pathways with Toriel, a cutscene will play where she says she has to go for a bit. Walk to the end of the room, and you'll find out she was just hiding behind a pillar. But this time, she tells you she actually has to run a quick errand. She gives you a cell phone because of this. Right now, you can only call Toriel on it, but it will get You will reach a room with cracked floor in front of you, just walk onto the cracked tiles. You will fall through the floor, but that's not a problem, since there are stairs at the side of the room you need to exit at. Simple. In the next room, you will find a rock. After you take a few steps, Toriel will call you and ask if you prefer butterscotch or cinnamon. Pick whichever you like more and push the rock into the white tile at the end of its pathway, and move on to the next room. In this room, you will find a ton of cracked tiles. If you fall through one of the tiles, you will be in a room with leaves scattered around the floor, and a sign on the wall that reads "please do not step on the leaves". This is hinting the solution to the puzzle. Memorize the pattern of the leaves and avoid them. Once you reach the end of that room, move on. In this room, you will find three rocks. You know what to do. The bottom rock will keep acting dumb, so just keep pushing it into its respective white tile at the end of its pathway until it stays. Move on to the next room. In the next room, you will find a save point. Be sure to save and go on to the next room to fight the first boss. You will find a ghost laying down on the leaves pretending to Name - Napstablook Strategy - Cheer Napstablook 4 times to spare him. After you spare Napstablook, I suggest you go into the room into the right before you move onwards. You will find two spider webs that sell you healing items. I suggest buying at least 1 to skip a boss fight later in the game. Once you've done this, go into the room you saw upwards. This room has three Froggits in a row. Talk to them for tutorial information. Walk to the end of the room to move on to the next one. This next room has 6 cracked tiles in it. At the end of the room is a blockade the doesn't allow you to pass. Fall down the cracked floor tile in the top-middle. You will find a switch, flip it, and the blockade will disappear, allowing you access to the next room. By the way, the cracked floor tile in the bottom left has the Faded Ribbon item. Feel free to equip it if you'd like. This final puzzle contains three colored switches, and a sign that tells you which switch to press. Press the switch that the sign tells you to press, and move on. You will be in another room with 2 colored switches, and 1 switch hidden behind a pillar. Press the one hidden behind the pillar, then move on. This is the final room. There is one colored switch, and 2 hidden switches. What I do here is press one of the hidden switches and try my luck. Once you pressed the correct switch, move on to the next room. There is an item to the east, but it raises your attack. And since this is a Pacifist route, you don't really need it. Go up and you'll finally find Toriel again. She will invite you inside her house. Be sure to save at the save point outside her house, because you are about to face the second boss. Head inside Toriel's home. Toriel shows you your room. Go ahead and feel free to go to Toriel will be walking down the pathway, asking you to go back to your room. She also says that the exit to the Ruins is up ahead, and she is going to destroy it. She explains that every time a human falls down here, they always die. She wants to protect you. Disobey her and keep following her. You will reach the door that exits the Ruins. Be prepared to fight another boss! Name - Toriel Strategy - If you try and use the Act option, nothing will happen. Because of this, you will have to choose Spare over and over again until she finally gives in. Try and dodge her attacks to the best of your ability. You will know that the battle is almost over when she misses her attacks on purpose. Good luck! Once you have spared her, she will allow you to pass, but not without a goodbye hug! Also, from this point on in the game, you will not be able to talk to Toriel. Once you go through the door, you will find yourself in a similar area from when you started. Flowey will appear again, and say some words, different depending on what you did so far. After he finishes talking, go to the end of the room, and exit to find yourself in a snowy looking area.... |
Vizzed Elite
Affected by 'Laziness Syndrome'
Registered: 07-30-13
Location: Denver, CO
Last Post: 572 days
Last Active: 290 days
| The Dragon of Rock Bottom |
Affected by 'Laziness Syndrome'
Registered: 07-30-13
Location: Denver, CO
Last Post: 572 days
Last Active: 290 days
(edited by LunarDarkness2 on 01-04-16 03:33 PM)
01-05-16 07:07 AM
 Uzar is Offline
| ID: 1232895 | 56 Words
Uzar is Offline
| ID: 1232895 | 56 Words
 Uzar is Offline
| ID: 1232895 | 56 Words
Uzar
A user of this
A user of this
Level: 140

POSTS: 3634/6433
POST EXP: 345123
LVL EXP: 32633506
CP: 25933.5
VIZ: 555693

POSTS: 3634/6433
POST EXP: 345123
LVL EXP: 32633506
CP: 25933.5
VIZ: 555693
Likes: 0 Dislikes: 0
What the heck is this guide? I don't remember any of this. All you're supposed to do is FIGHT! How else are you supposed to gain love, baka?! But seriously though, this is a neat guide. I know there's like...4 enemies I needed help with. So a guide definitely would be helpful to some people. But seriously though, this is a neat guide. I know there's like...4 enemies I needed help with. So a guide definitely would be helpful to some people. |
Vizzed Elite
Affected by 'Laziness Syndrome'
Registered: 06-03-13
Location: Airship Bostonius
Last Post: 1927 days
Last Active: 1898 days
| I wonder what the character limit on this thing is. |
Affected by 'Laziness Syndrome'
Registered: 06-03-13
Location: Airship Bostonius
Last Post: 1927 days
Last Active: 1898 days
01-05-16 12:12 PM
janus is Offline
| ID: 1232966 | 39 Words
| ID: 1232966 | 39 Words
janus
SecureYourCodeDavid
SecureYourCodeDavid
Level: 124
POSTS: 3231/4808
POST EXP: 565097
LVL EXP: 21531145
CP: 62699.4
VIZ: 466758
POSTS: 3231/4808
POST EXP: 565097
LVL EXP: 21531145
CP: 62699.4
VIZ: 466758
Likes: 0 Dislikes: 0
No link to the original game? I feel like something is missing... Anyway this was a very original guide. I though pacifist runs only existed in speedruns. It looks detailed enough for me to maybe use it one day! Anyway this was a very original guide. I though pacifist runs only existed in speedruns. It looks detailed enough for me to maybe use it one day! |
Site Staff
YouTube Video Editor
Affected by 'Laziness Syndrome'
Registered: 12-14-12
Location: Murica
Last Post: 92 days
Last Active: 6 hours
YouTube Video Editor
| the unknown |
Affected by 'Laziness Syndrome'
Registered: 12-14-12
Location: Murica
Last Post: 92 days
Last Active: 6 hours
