

 User Notice
 Forum Links
Play Mega Man Online
Thread Information
Views
1,339
Replies
5
Rating
12
Status
OPEN
Thread
Creator
Creator
ZeroTails
06-16-15 10:53 AM
06-16-15 10:53 AM
Last
Post
Post
sonicthehedgeho..
06-16-15 01:49 PM
06-16-15 01:49 PM
System
8.7
Views: 697
Today: 0
Users: 1 unique
Today: 0
Users: 1 unique
Thread Actions


Order
Mega Man Walkthrough
Game's Ratings
Overall
Graphics
Sound
Addictiveness
Depth
Story
Difficulty
Average User Score
8.7
7.2
8.2
7.8
7.1
6.4
8.1
06-16-15 10:53 AM
 ZeroTails is Offline
| ID: 1176520 | 5362 Words
ZeroTails is Offline
| ID: 1176520 | 5362 Words
 ZeroTails is Offline
| ID: 1176520 | 5362 Words
ZeroTails
Cool Davideo7
Cool Davideo7
Level: 90


POSTS: 666/2465
POST EXP: 215125
LVL EXP: 7185589
CP: 18922.4
VIZ: 400242

POSTS: 666/2465
POST EXP: 215125
LVL EXP: 7185589
CP: 18922.4
VIZ: 400242
Likes: 11 Dislikes: 0
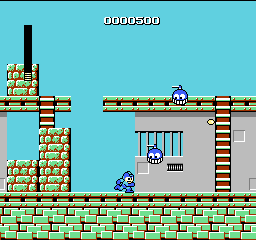
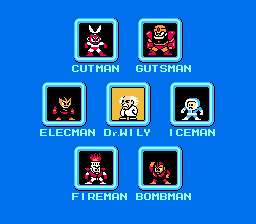
Introduction: Well well… I guess this is my first game guide as a Staff member :p. So, let’s get into it, shall we? Story: There was this smart scientist named Dr. Light. He created robots to make life better for everyone! But, Dr. Wily, his rival, was jealous of all the attention Dr. Light has gotten. So, Dr. Wily decided to reprogram all of his robots (save two) to work for him, and he ordered them to cause chaos. One of the robots that Wily decided not to reprogram, Rock, had a strong sense of justice. So by Rock’s request, Light made him a super fighting robot by the name of Rockman, better known in North America as Megaman. Controls: -The A button makes you jump -The B button makes you shot the Mega buster or one of the special weapons -The Start button pulls up the menu where you can look at your life count, or choose a special weapon you have gotten. Note: This mystical “special weapon” I keep on mentioning is acquired by beating a Robot Master, the six robots that Wily reprogrammed. The Actual Walkthrough:  You start off on a screen where you can pick what Robot Master to go after. You can go after any in any order, but I have picked a path that will be easy to go through, without much backtracking. First Robot Master is Bombman! Bombman’s Stage: You start off… somewhere. When you inevitably go right, you will be greeted by a “Flea”. This Flea will try to jump into you. One buster shot should kill it easily. After a few Flea’s, there will be some pits with “Bombombs” coming out of them. MARIO REFERENCE SPOTTED! Anyways, the Bombomb will “jump” out of the hole, and split into four tiny bombs. Two tiny bombs will go to each side, and explode on impact. It’s also invincible. To get past it, wait until the Bombomb has went up and split, then jump across. You don’t want to jump when the Bombomb is coming up, since you would get hit and possibly die. After the section with the Bombombs, there will be a new enemy called a “Screw Bomber”. This enemy will shoot in 5 directions: Up, left, right, up-left, and up-right. Shoot it down when it comes up to shoot you. To the very right will be weapon energy. This is useless right now, but it refills used special weapon energy. To progress, platform up the platforms to the left of the weapon energy.  Now go up the ladder to the top right. Up the ladder will be a new enemy called a “Beak”. This Beak will shoot pellets in a lot of different directions. Just try your best to avoid them. You can destroy the Beak if you shoot it once when it’s opened up, but that’s also when it starts shooting pellets. Go up the next ladder to the top left, and get the health container if you wish to risk your life (there are spikes near the health… and spikes are insta-kill. Even with invincibility frames <.<). At the top of the ladder, go right. There will be a “Sniper Joe” there. The Sniper Joe is invincible, unless it’s jumping or shooting at you. So, try to shoot it down when it’s vulnerable, while avoiding the shots. Note: The Sniper Joe won’t make itself vulnerable unless you aren’t shooting at it. So, wait until the Sniper Joe is shooting or jumping to shoot it. To the right of the Sniper Joe is are some pits with yet another new enemy, the Bullet Bill. Erm, I mean the “Killer Bullet”. The Killer Bullet goes across the screen, and if you shoot it, it explodes.The explosion hurts (Rilly!?). This segment will have the before mentioned Killer Bullets, and some Beaks as well. After that section is a ladder. Go up it. At the top is another new enemy, called the “Spine”. It’s invincible unless you use a special weapon, called the Rolling Cutter (gotten from Cutman), which you obviously don’t have yet. So just avoid it, and go up and right. Go up the ladder. In the next screen, platform across the small platforms to get to the other ladder to the left. Make sure to avoid the Killer Bullet, and not epicly fail and fall into the spikes. At the top of the ladder will be another new enemy (increasing nauseum), called a “Flying Shell”. This enemy will shoot pellets in ALL 8 DIRECTIONS, M8! It’s also invulnerable unless it pops out of it’s shell. Just avoid it since it spawns infinitely. Go to the right, platforming to avoid the spikes, and climb up the ladder you will eventually see. To the right is a little opening with a Sniper Joe and an extra life. Go get the life if you really need it. Now, go down, and go right. You’re almost there, just beat the final Sniper Joe! Go through the door. Now go down the ladder after the door. There will be yet another new enemy, called the “Octopus Battery”. But… it’s not even an octopus :’(. I cri evrytiem. Anyways, they will go either up and down, or left to right. This time, it’s left to right. Avoid them, or just drop down. There will be two screens of them. After those two screens, you’re at the boss. Boss Fight: Bombman: Yay, first Robot Master battle! Bombman will 1. Jump around the room 2. Throw bombs at you. So yea, try to avoid his bombs, and shoot him when you can. He tries to get away from you when you get close, so use that. This is a fairly easy Robot Master fight. Note: His weakness is Fireman’s weapon, btw. You get the Hyper Bomb from defeating Bombman. When you use it, you will throw a bomb. The bomb will explode after a certain amount of time. Who is weak to bombs? Gutsman? Okay, let’s go there next! Gutsman’s Stage: He has GUTS! The first thing you will see when you enter the stage is a new enemy called a “Met”, “Hardhat”, “Metool”, whatever you want to call it. For this guide, I’ll call it a “Met”. Anyways, the Met will hide in that hat it lives in, and come out to shoot three pellets that are spread out at you. One shot when it comes out should do the trick. There will be two more Mets at the beginning, and then comes the hard part. The legendary moving contraption with platforms.  What you have to do is first jump on the first moving platform. Ride it until you can get onto the platform below it. Jump when the platform goes over a break, and wait until the next moving platform below it comes along. Ride that last platform to the end, jumping when it passes a break. Then jump for the solid land at the end. The hard part is the timing with jumping when you reach a break. So yea, doing this is harder than it sounds. After that part, there will be another new enemy. It’s called the “Blader”. It will attempt to attack you from above, and rather quickly as well. Try to shoot them when they are low enough to shoot. After a few of them will be a health container, and another new enemy called the “Picket Man”. It will protect itself with a shield, then throw a lot of… pickaxes at you. Shoot it down when it’s throwing the pickaxes, while avoiding the pickaxes. After the part with the Picket Mans will be a vertical hallway you have to drop through. Drop through it, but hold left so that you can land on a platform. There will be a few Bladers here. Now drop to the left, and hold right. You will get a big health container! There will be more Bladers here as well. Now drop to the right. You will fall on a small health container, but miss the extra life. Now go to the left and fall down the vertical hallway.  Almost done! Now you have to face another new enemy- the legendary “Big Eye”. It’s legendary because if it runs into you, you lose ⅓ of your health :V. It jumps towards you, so go under it when it jumps high. Or fight it if you dare <.<. Now go into the door. There will be a lot of Mets in the hallway, and the easiest way of taking care of them is to rush at them, shooting pellets. Now go through the door after that, to get to the boss. Boss Fight: Gutsman: Time to fight someone with GUTS! Anyways, Gutsman will 1. Jump towards you. When he lands, you will be unable to move if you were on the ground. 2. Throw a piece of rock at you, which will split up while he’s throwing it. You can use the Mega Buster, which does one bar of damage, or you can use the Hyper Bomb which will destroy him in three hits if you have it. Not that challenging with the weakness. You get the Super Arm from Gutsman. The Super Arm allows you to pick up and throw certain rocks. It is very situational. Cutman is weak to those rocks. I think you know where we’re headed… Cutmans Stage: First, go up the ladder to your left. Then go right. There will be some Bladers so just shot them down. Continue to go to the right, destroying the Bladers along the way. After the first pit, there will be a Beak high up on a wall. Ignore it, and continue to the right. There will be another Beak to the right. Go up the ladder you will see, and destroy the Beak if you must. Then go up the other ladder to the right. At the top, either shoot or ignore the Beak to the right, and proceed to the ladder to the left. On the top of the ladder, shoot the Beaks to the right. Then go up the ladder to the right. Yet another room with Beaks and ladders… you know what to do. After another screen like that is a iron block thing with a hole in it. A new enemy, the “Super Cutter” will come out of the hole. Just walk right past the hole without stopping to avoid it.  There will be Fleas right after that part. After the pit in the ground, there will be Octopus Batteries. Try to shoot them down, or just avoid them entirely (it’s easier to do this than it sounds, imo). I like to do a mixture of both, avoiding some, and destroying the others. After a few screens of that will be another area with the Super Cutters. Again, just walk right past. After that will be more Bladers, and a big health capsule. After getting the capsule, go down the ladder. There will be a Flying Shell. Just go down the ladders. The next screen will have another Flying Shell, but with spikes <.<. Try to not fall in the spikes, and go down the next ladder. After that will be the Big Eye… try to jump over it if you can, since you have the higher ground this time. And we’re almost done! Just go through the door. There will be some Screw Bombers, and some are on the ceiling! Just shoot them down (ignore the one ceiling one). Now, boss time! Boss Fight: Cutman: This is said to be the easiest robot master. Anyways, Cutman will 1. Jump around 2. Throw the scissors on his head at you. They will move in a boomerang style. He also jumps around when he has thrown the scissors at you. You can, of course, use the buster, but using the weakness is just so much easier. There are two blocks in Cutman’s room that you can lift up with the Super Arm. Each time Cutman is hit with one of those blocks, he takes half damage. If you don’t miss, you can take down Cutman with two hits. If you do miss… back to the buster. You get the Boomerang Cutter from Cutman. You throw scissors, and they act like a boomerang. Elecman is weak to the Boomerang Cutter. So, it’s time to go there. Elecman’s Stage: This stage is electrifying  Now the platforms have ELECTRICITY TRAPS! Basically, electricity comes out of the area with the two blue circles horizontally. Jump on the platforms when the electricity isn’t activated (you can be on the platform when it’s activated, you just can’t touch the electricity.). Go up the ladder after that (or go down the ladder to the right for a big health capsule). The next screen will have one long ladder, and some new enemies. It’s called the “Watcher”. It’s always watching <.<. Anyways, it will float up or down from the screen, and try to shoot electric beams at you, two at a time. They also go away after a while. It’s hard to try to squeeze between the electricity, so just shoot them down. There will be two screens of them. At the top of the ladder, (finally), will be one platform, with ladders way above it. All seems lost, until the disappearing blocks of doom come. To get past it, jump on the one platform, and then jump again. The first disappearing block is right above that platform. Then after the second one appears to the left, jump to the right. There will be another disappearing block there. Now go to the ladder. (if you took the other path, you get weapon energy). Now the disappearing blocks will appear to the left of the ladder. It will make a little bridge to the opening to the left, so slowly walk across there when the blocks appear. Now go up that ladder, and go up the other ladder to the left. At the top, go to the right and jump across the tiny platforms. Don’t go for the health container. It is a death trap unless you have the Magnet Beam, which you have no way of having yet (it’s found later in this stage). Go up the ladder to the end. Now you have two options: outside (to the left) or inside (to the right) (with some Watchers). You can go either way, so I’ll cover BOTH. Outside: Go up the ladder to the left. There will be platforms with Spines on them. Use the Rolling Cutter, and go up the next ladder. The next screen has some empty platforms and… eventually, Watchers. Told you they’re always watching <.<. Try to avoid the electricity, and shoot them. Go up the next ladder. This is where the passageways meet. Inside: Go up the ladder to the right. Now go up the ladder after that ladder, avoiding the electricity from the traps. On the next screen, shoot the Watchers. Then go up the next ladder. This is where the passages meet.  Now go up the next ladder, and go to the blocks to the right. Use the Super Arm to get rid of them, and pick up the item. It’s the Magnet Beam! You can make platforms with the Magnet Beam to stand on! This item is completely necessary for beating the game, btw. You have another choice… left or right, outside or inside. You can go through any, but the right path requires the Super Arm. Outside: Go up the ladder to the left. Now get rid of the Spines with the Super Cutter (or just ignore them), and go up the next ladder. Now go up the next ladder, avoiding the electric traps. Finish climbing up the ladder, avoiding more electric traps, and this is where the paths combine. Inside: Go up the ladder to the right. Avoid the electric traps while going up the ladder. Something something ladders and electric traps (aka, same thing, more ladders and traps). On the next screen, get rid of the single Flea, and use the Super Arm to get rid of the block (this is why you needed it). Then get rid of the Flea outside, and use the Magnet Beam to get yourself out. Then the paths combines. Go up the ladder, and go to the right, jumping on the tiny platforms. Go up that ladder, and then jump on the platforms with the electricity traps, avoiding the electricity. Go up the ladder. You’re almost done! Just avoid the Big Eye, and go through the door. Go up the ladder after the door, and avoid the electric traps for two screens. Then, boss time. Boss Fight: Elecman: He’s electrifying! He will 1. Jump around 2. Shoot out this electric beam that takes away ⅓ of your health O.o Yea… try to avoid the electricity. Having the higher ground helps. You can use the buster, or you can use the Rolling Cutter, which takes away ⅓ of his health. Use the Rolling Cutter, (and if you don’t have it, this will be a very hard battle). You go the Thunder Beam! The Thunder Beam shoots in three different directions: up, down, and across. It’s very helpful, and it’s arguably the best special weapon in the game. Iceman is weak to it, so we’re going to Iceman next. Iceman’s Stage: Ice everywhere O.O. And so, there are ice physics ;-;. To the right will be a new enemy called the “Crazy Razy”. It is very crazy, as in it will try to run into you. If you destroy the body, it’s head will fly up and attack you from above (shooting the head once before just destroys it, so do that). There will be quite a few of them here, so just shoot the head to make everything easier. After that will be water O.O.  Water is very special. You can jump HIGHER in it :V (not very high in this game, tho ;-; ). However that works. Anyways, in the water will be some Spines, and a new enemy called the “Peng”. They move up and down, trying to run into you. After you get out of the water, there will be a hole with Octopus Batteries blocking a health container to the left. Just shoot them down if you need it. Now go down the hole to the right, aaand we’re stuck (with a Spine). Yep, you need to use the disappearing blocks ;w;. Or if you have the Magnet Beam, you can get past wayyy easier. If you’re jumping on the blocks, get rid of the Spine first with the Rolling Cutter. Anyways, first jump on the lowest disappearing block. Then when the second one to the left appears, wait a little then jump to the right. You will land on the third disappearing block (avoid the second one). Then jump to the fourth one to the right. When the fifth appears, wait, and then jump to the left. You will land on the sixth. Then just jump on the seventh block, and then jump to the left to finish the section. Fall down in the hole to the left. Yep, it’s another one of those disappearing block puzzles. Get rid of the Spine, then do this if you’re gonna do the disappearing block puzzle. First, jump on the lowest block to the right. Then jump to the left. Then jump to the left again. Now try to jump to the left to the next block, since it’s pretty far apart. When the next set of blocks appear, jump to the right. You will land on another block. Then jump straight up, to land on the block right above, then jump to the right and then to solid ground.  *sighs* now it’s the hard part of the stage. These enemies in the sky are called “Foot Holder”. You can stand on them, they shoot bullets horizontally, and they move randomly. You are supposed to use them to get across a bottomless pit. NOPE. I’m not doing that, and neither should you. So instead use the Magnet Beam. Make sure to get the weapon energy in the middle! At the end of this segment, go down the hole to the right (and get the extra life if you so desire). Hole left if you want the goodies to the left on the next screen, then fall down the hole to the left. There will be a Big Eye, and then the door (this level is realllly short <.<). In the door will be a lot of Pengs. Destroy them all, then go through the door to Iceman. Boss Fight: Iceman: Well, attacks. 1. Jump and shoot out pieces of ice that take away ⅓ of your health, just like Elecman’s electricity attack. Well, try to jump in between the pieces of ice (the lag will make it easier to dodge XP), and shoot the Thunder Beam at him. He will be destroyed very quickly. You got the Ice Slasher from Iceman! It’s a piece of ice. It doesn’t damage enemies or bosses (with a few exceptions), but it can freeze them :V. The only Robot Master left is Fireman, and he is also weak to the Ice Slasher. Fireman’s Stage: Fire and lava. You will start off… somewhere  You can freeze the fire tower temporally with the Ice Slasher, though. Proceed to the ladder, and go up it. Now go up the ladders to get past this screen, or freeze the fire towers to get the health containers. Now go to the right at the top of the ladder, avoiding more fire towers. Aaand now there’s a new hazard, the fire flamethrowers or whatever. Just, avoid them and proceed onwards. After avoiding flamethrowers and fire towers, you will come to a ladder (with health containers next to it). Go down it. There will be more fire towers and Tackle Fires! Go down the ladder to the left. Drop down onto the platform with the fire tower (without falling down into the lava <.<). Now go across the platforms, avoiding the Tackle Fires and NOT falling down into the lava. Go up the very last ladder to the right. Oh boy… the fire whatever room. Now either TRY to avoid the fire from the tube or whatever, or just use the Magnet Beam.  Now go up the next ladder. There will be the Killer Bullets and the Spines. Go down the ladders, and proceed to the right (get the big weapon energy container if you need it). Jump over the pits of fire, looking out for the Tackle Fires. Then, there’s the door, with fire towers in front of it. There will be Screw Bombers on the ceiling inside, so just avoid them. Then, boss time. Boss Fight: Fireman: This is possibly the hardest boss with the weakness. He will 1. Walk around <.< 2. Shoot out this fire attack. Sometimes once, sometimes several times in a row. The catch is, there will be a speck of fire on the ground where you jumped over the fire attack. So yea, if you have the Ice Slasher, the best thing you can do is spam it. If not, then hope that you avoid the fire attack AND not land on the speck of fire on the floor. You now have the Fire Storm! You will shoot out a wave of fire, and you will have a fire shield when you shoot it out as well :3. Next Robot Master is… there ARE no other Robot Masters :V. Welp, it’s time to go get Dr. Wily. Dr. Wily’s Stage 1: Time to get the evil mastermind (time for the annoying sound from his flying saucer or whatever it is and the eyebrows!). Anyways, first off is OMG A BIG EYE! Yep, and not only one, but THREE Big Eyes :V. Um, try to freeze them in the air with the Ice Slasher then go under them… after that part are some blocks that you need the Super Arm to go through. Now there will be fire towers that move up and down. Use the Ice Slasher to freeze them (try to freeze them when they are barely out of the place. Basically, go as low as you can to freeze them)  On the next screen will be spikes. Completely go up the ladder, then drop down to the second platform. Jump to the third, then jump to the ladder and climb up it. On top of the ladder will be Fleas. Get rid of them. Then go to the right. To continue in the stage, get rid of the blocks to the bottom with the Super Arm (do the top one if you want health). On the next screen, go left to fall down to the next level, then jump over the spikes to these small platforms. A Killer Bullet will be going through that section, so be careful. Drop down to the third level, then go to the left and go down the ladder. There’s the Foot Holder section *sighs*. And there are spikes on the ceiling and floor as well. Just use the Magnet Beam to get across. There are two weapon energy containers right before the ladder. Get them, and go up.  You NEED the Magnet Beam to go past this part O.o. You have to make platforms to get through the room. If you run out of weapon energy, then you can go down the ladder for some more weapon energy (the containers respawn). After you go up the ladder, go to the right for a boss. Boss Fight: Yellow Devil: OH NO IT’S THAT BOSS! First thing that happens is that there will be yellow blobs coming at you from the left side of the screen! Jump over the ones that you can’t just avoid by standing still, and yea. When the Yellow Devil is a whole, it will reveal it’s eye and shoot a pellet at you. Shoot the Thunder Beam into the eye. Rinse and repeat. What makes this boss so hard is that the yellow blobs move so quickly. Welp, after you beat it comes the second level. Note: In the NES version, there’s a “pause glitch”. Basically when you shoot the Thunder beam, you pause. The hitting code or whatever is reset, so it hits the Yellow Devil multiple times. Dr. Wily Stage 2: Yep, outside now. You will face Bladers. And more Bladers. With bottomless pits :V. And then, you will go inside, and fall down a hole O.o. CUTMAN!!! Yep, you gotta fight Cutman again. And you can’t use his weakness either (there are no blocks in the room). Oh well, Cutman’s pretty easy anyways. After that, fall down the invisible hole to the left, and proceed onwards. There will be Screw Bombers. Avoid their shoots, and fall down the next invisible pit. You will face Elecman, so use the Rolling Cutter against him. After you beat Elecman, fall down the invisible pit. Now, there will be BOMBOMBS :V. So yea, avoid the little bombs and just be careful. After that part will be a ladder. Go down the ladder. You will see Octopus Batteries. Shoot them, or avoid them (use the Thunder Beam if you want to destroy them since the beam goes BELOW you :3). After three screens of them will be a screen with four Beaks. Use the Thunder Beam. The next screen has Octopus Batteries AND a Beak. Use the Thunder beam, then. The next screen will have the boss. Boss Fight: Copy Megaman: You are fighting YOURSELF :V. Basically, whatever weapon you have equipped, the copy will also equip, and use that said weapon. The best weapon to use is either the Fire Storm or the Thunder Beam, because you have a decent amount of each, and the copy likes to jump over your attacks, making it’s attacks miss you (if you stand and don’t jump). Anyways, best fought on a full bar of health. Dr. Wily Stage 3: You’re in the sewers O.o. Anyways, there will be Octopus Batteries. The next screen will have more Octopus Batteries, with a Screw Bomber. The next two screens will have the same thing. Just drop down and take the hits. The next section, you will go to the right, and water will come and push you to the right. You will face Pengs, then Killer Bullets in this tunnel. Shoot rapidly to kill them all, and collect the goodies you will get. After that, boss time (such a short level :’))  Boss Fight: CWU-01P: Such a confusing name… anyways, it will go around the room, shooting out little bubbles. It’s weakness is the Super Arm (hence the blocks in the room), but DON’T use the block yet. There isn’t enough to kill the boss completely with just the weakness, and you want the blocks for the later stages of the fight. You keep on shooting it until the big bubble pops. Everytime it pops, the boss will get a little faster. Pop the bubble three time, then use the blocks for the final few stages, since it’s gonna be really fast at the end. After that, the final level awaits. Dr. Wily Stage FINAL: You start off in a room, where there will be spikes and Watchers. Go up the ladder, and fight more Watchers. At the top of the ladder, use the Super Arm to get rid of the blocks. Go to the right. There will be a passageway with GUTSMAN STATUES IN THE CEILING, and Screw Bombers. Avoid the Screw Bombers. After that will be ladders, and the contraption from Gutsman’s Stage again ;-;. Just use the Magnet Beam to get across.  Go BELOW the platform that you need to go to. Why? An extra life, and the super rare item (there’s only one in the entire game) known as the Yashichi. The Yashichi will refill ALL your health AND weapon energy. Very helpful. Now get up the ladder, and go into the teleporter. You will fight these bosses in this order. Bombman (weakness is Fire Storm), Fireman (weakness is Ice Slasher), Iceman (weakness is Thunder Beam), and at last, Dr. Wily’s favorite, Gutsman (weakness is Hyper Bomb). After that rush of bosses will be an empty room, with a big weapon energy container right next to the door. Fill up Fire Storm, and go into the room. FINAL Boss Fight: Dr. Wily Stage 1 of 2: Welp, final boss time. Dr. Wily will move left and right, and he will shoot out these pellets that goes in an arc. Avoid them, and use the Fire Storm on him to destroy it quite quickly. Then, the last phase begins. FINAL Boss Fight: Dr. Wily Stage 2 of 2: Final phase time. This time, there are no weaknesses, but the Rolling Cutter can do the most damage via doing multiple hits in one go. Well, Dr. Wily will shoot out a big ball of energy, and to avoid it you must try to get far away from it, and then jump over. After you beat this phase, you have beat the game. Now the credits roll, Dr. Wily is beaten, peace, and all that good stuff. END OF GUIDE Well well… I guess this is my first game guide as a Staff member :p. So, let’s get into it, shall we? Story: There was this smart scientist named Dr. Light. He created robots to make life better for everyone! But, Dr. Wily, his rival, was jealous of all the attention Dr. Light has gotten. So, Dr. Wily decided to reprogram all of his robots (save two) to work for him, and he ordered them to cause chaos. One of the robots that Wily decided not to reprogram, Rock, had a strong sense of justice. So by Rock’s request, Light made him a super fighting robot by the name of Rockman, better known in North America as Megaman. Controls: -The A button makes you jump -The B button makes you shot the Mega buster or one of the special weapons -The Start button pulls up the menu where you can look at your life count, or choose a special weapon you have gotten. Note: This mystical “special weapon” I keep on mentioning is acquired by beating a Robot Master, the six robots that Wily reprogrammed. The Actual Walkthrough: You start off on a screen where you can pick what Robot Master to go after. You can go after any in any order, but I have picked a path that will be easy to go through, without much backtracking. First Robot Master is Bombman! Bombman’s Stage: You start off… somewhere. When you inevitably go right, you will be greeted by a “Flea”. This Flea will try to jump into you. One buster shot should kill it easily. After a few Flea’s, there will be some pits with “Bombombs” coming out of them. MARIO REFERENCE SPOTTED! Anyways, the Bombomb will “jump” out of the hole, and split into four tiny bombs. Two tiny bombs will go to each side, and explode on impact. It’s also invincible. To get past it, wait until the Bombomb has went up and split, then jump across. You don’t want to jump when the Bombomb is coming up, since you would get hit and possibly die. After the section with the Bombombs, there will be a new enemy called a “Screw Bomber”. This enemy will shoot in 5 directions: Up, left, right, up-left, and up-right. Shoot it down when it comes up to shoot you. To the very right will be weapon energy. This is useless right now, but it refills used special weapon energy. To progress, platform up the platforms to the left of the weapon energy. Now go up the ladder to the top right. Up the ladder will be a new enemy called a “Beak”. This Beak will shoot pellets in a lot of different directions. Just try your best to avoid them. You can destroy the Beak if you shoot it once when it’s opened up, but that’s also when it starts shooting pellets. Go up the next ladder to the top left, and get the health container if you wish to risk your life (there are spikes near the health… and spikes are insta-kill. Even with invincibility frames <.<). At the top of the ladder, go right. There will be a “Sniper Joe” there. The Sniper Joe is invincible, unless it’s jumping or shooting at you. So, try to shoot it down when it’s vulnerable, while avoiding the shots. Note: The Sniper Joe won’t make itself vulnerable unless you aren’t shooting at it. So, wait until the Sniper Joe is shooting or jumping to shoot it. To the right of the Sniper Joe is are some pits with yet another new enemy, the Bullet Bill. Erm, I mean the “Killer Bullet”. The Killer Bullet goes across the screen, and if you shoot it, it explodes.The explosion hurts (Rilly!?). This segment will have the before mentioned Killer Bullets, and some Beaks as well. After that section is a ladder. Go up it. At the top is another new enemy, called the “Spine”. It’s invincible unless you use a special weapon, called the Rolling Cutter (gotten from Cutman), which you obviously don’t have yet. So just avoid it, and go up and right. Go up the ladder. In the next screen, platform across the small platforms to get to the other ladder to the left. Make sure to avoid the Killer Bullet, and not epicly fail and fall into the spikes. At the top of the ladder will be another new enemy (increasing nauseum), called a “Flying Shell”. This enemy will shoot pellets in ALL 8 DIRECTIONS, M8! It’s also invulnerable unless it pops out of it’s shell. Just avoid it since it spawns infinitely. Go to the right, platforming to avoid the spikes, and climb up the ladder you will eventually see. To the right is a little opening with a Sniper Joe and an extra life. Go get the life if you really need it. Now, go down, and go right. You’re almost there, just beat the final Sniper Joe! Go through the door. Now go down the ladder after the door. There will be yet another new enemy, called the “Octopus Battery”. But… it’s not even an octopus :’(. I cri evrytiem. Anyways, they will go either up and down, or left to right. This time, it’s left to right. Avoid them, or just drop down. There will be two screens of them. After those two screens, you’re at the boss. Boss Fight: Bombman: Yay, first Robot Master battle! Bombman will 1. Jump around the room 2. Throw bombs at you. So yea, try to avoid his bombs, and shoot him when you can. He tries to get away from you when you get close, so use that. This is a fairly easy Robot Master fight. Note: His weakness is Fireman’s weapon, btw. You get the Hyper Bomb from defeating Bombman. When you use it, you will throw a bomb. The bomb will explode after a certain amount of time. Who is weak to bombs? Gutsman? Okay, let’s go there next! Gutsman’s Stage: He has GUTS! The first thing you will see when you enter the stage is a new enemy called a “Met”, “Hardhat”, “Metool”, whatever you want to call it. For this guide, I’ll call it a “Met”. Anyways, the Met will hide in that hat it lives in, and come out to shoot three pellets that are spread out at you. One shot when it comes out should do the trick. There will be two more Mets at the beginning, and then comes the hard part. The legendary moving contraption with platforms. What you have to do is first jump on the first moving platform. Ride it until you can get onto the platform below it. Jump when the platform goes over a break, and wait until the next moving platform below it comes along. Ride that last platform to the end, jumping when it passes a break. Then jump for the solid land at the end. The hard part is the timing with jumping when you reach a break. So yea, doing this is harder than it sounds. After that part, there will be another new enemy. It’s called the “Blader”. It will attempt to attack you from above, and rather quickly as well. Try to shoot them when they are low enough to shoot. After a few of them will be a health container, and another new enemy called the “Picket Man”. It will protect itself with a shield, then throw a lot of… pickaxes at you. Shoot it down when it’s throwing the pickaxes, while avoiding the pickaxes. After the part with the Picket Mans will be a vertical hallway you have to drop through. Drop through it, but hold left so that you can land on a platform. There will be a few Bladers here. Now drop to the left, and hold right. You will get a big health container! There will be more Bladers here as well. Now drop to the right. You will fall on a small health container, but miss the extra life. Now go to the left and fall down the vertical hallway. Almost done! Now you have to face another new enemy- the legendary “Big Eye”. It’s legendary because if it runs into you, you lose ⅓ of your health :V. It jumps towards you, so go under it when it jumps high. Or fight it if you dare <.<. Now go into the door. There will be a lot of Mets in the hallway, and the easiest way of taking care of them is to rush at them, shooting pellets. Now go through the door after that, to get to the boss. Boss Fight: Gutsman: Time to fight someone with GUTS! Anyways, Gutsman will 1. Jump towards you. When he lands, you will be unable to move if you were on the ground. 2. Throw a piece of rock at you, which will split up while he’s throwing it. You can use the Mega Buster, which does one bar of damage, or you can use the Hyper Bomb which will destroy him in three hits if you have it. Not that challenging with the weakness. You get the Super Arm from Gutsman. The Super Arm allows you to pick up and throw certain rocks. It is very situational. Cutman is weak to those rocks. I think you know where we’re headed… Cutmans Stage: First, go up the ladder to your left. Then go right. There will be some Bladers so just shot them down. Continue to go to the right, destroying the Bladers along the way. After the first pit, there will be a Beak high up on a wall. Ignore it, and continue to the right. There will be another Beak to the right. Go up the ladder you will see, and destroy the Beak if you must. Then go up the other ladder to the right. At the top, either shoot or ignore the Beak to the right, and proceed to the ladder to the left. On the top of the ladder, shoot the Beaks to the right. Then go up the ladder to the right. Yet another room with Beaks and ladders… you know what to do. After another screen like that is a iron block thing with a hole in it. A new enemy, the “Super Cutter” will come out of the hole. Just walk right past the hole without stopping to avoid it. There will be Fleas right after that part. After the pit in the ground, there will be Octopus Batteries. Try to shoot them down, or just avoid them entirely (it’s easier to do this than it sounds, imo). I like to do a mixture of both, avoiding some, and destroying the others. After a few screens of that will be another area with the Super Cutters. Again, just walk right past. After that will be more Bladers, and a big health capsule. After getting the capsule, go down the ladder. There will be a Flying Shell. Just go down the ladders. The next screen will have another Flying Shell, but with spikes <.<. Try to not fall in the spikes, and go down the next ladder. After that will be the Big Eye… try to jump over it if you can, since you have the higher ground this time. And we’re almost done! Just go through the door. There will be some Screw Bombers, and some are on the ceiling! Just shoot them down (ignore the one ceiling one). Now, boss time! Boss Fight: Cutman: This is said to be the easiest robot master. Anyways, Cutman will 1. Jump around 2. Throw the scissors on his head at you. They will move in a boomerang style. He also jumps around when he has thrown the scissors at you. You can, of course, use the buster, but using the weakness is just so much easier. There are two blocks in Cutman’s room that you can lift up with the Super Arm. Each time Cutman is hit with one of those blocks, he takes half damage. If you don’t miss, you can take down Cutman with two hits. If you do miss… back to the buster. You get the Boomerang Cutter from Cutman. You throw scissors, and they act like a boomerang. Elecman is weak to the Boomerang Cutter. So, it’s time to go there. Elecman’s Stage: This stage is electrifying Now the platforms have ELECTRICITY TRAPS! Basically, electricity comes out of the area with the two blue circles horizontally. Jump on the platforms when the electricity isn’t activated (you can be on the platform when it’s activated, you just can’t touch the electricity.). Go up the ladder after that (or go down the ladder to the right for a big health capsule). The next screen will have one long ladder, and some new enemies. It’s called the “Watcher”. It’s always watching <.<. Anyways, it will float up or down from the screen, and try to shoot electric beams at you, two at a time. They also go away after a while. It’s hard to try to squeeze between the electricity, so just shoot them down. There will be two screens of them. At the top of the ladder, (finally), will be one platform, with ladders way above it. All seems lost, until the disappearing blocks of doom come. To get past it, jump on the one platform, and then jump again. The first disappearing block is right above that platform. Then after the second one appears to the left, jump to the right. There will be another disappearing block there. Now go to the ladder. (if you took the other path, you get weapon energy). Now the disappearing blocks will appear to the left of the ladder. It will make a little bridge to the opening to the left, so slowly walk across there when the blocks appear. Now go up that ladder, and go up the other ladder to the left. At the top, go to the right and jump across the tiny platforms. Don’t go for the health container. It is a death trap unless you have the Magnet Beam, which you have no way of having yet (it’s found later in this stage). Go up the ladder to the end. Now you have two options: outside (to the left) or inside (to the right) (with some Watchers). You can go either way, so I’ll cover BOTH. Outside: Go up the ladder to the left. There will be platforms with Spines on them. Use the Rolling Cutter, and go up the next ladder. The next screen has some empty platforms and… eventually, Watchers. Told you they’re always watching <.<. Try to avoid the electricity, and shoot them. Go up the next ladder. This is where the passageways meet. Inside: Go up the ladder to the right. Now go up the ladder after that ladder, avoiding the electricity from the traps. On the next screen, shoot the Watchers. Then go up the next ladder. This is where the passages meet. Now go up the next ladder, and go to the blocks to the right. Use the Super Arm to get rid of them, and pick up the item. It’s the Magnet Beam! You can make platforms with the Magnet Beam to stand on! This item is completely necessary for beating the game, btw. You have another choice… left or right, outside or inside. You can go through any, but the right path requires the Super Arm. Outside: Go up the ladder to the left. Now get rid of the Spines with the Super Cutter (or just ignore them), and go up the next ladder. Now go up the next ladder, avoiding the electric traps. Finish climbing up the ladder, avoiding more electric traps, and this is where the paths combine. Inside: Go up the ladder to the right. Avoid the electric traps while going up the ladder. Something something ladders and electric traps (aka, same thing, more ladders and traps). On the next screen, get rid of the single Flea, and use the Super Arm to get rid of the block (this is why you needed it). Then get rid of the Flea outside, and use the Magnet Beam to get yourself out. Then the paths combines. Go up the ladder, and go to the right, jumping on the tiny platforms. Go up that ladder, and then jump on the platforms with the electricity traps, avoiding the electricity. Go up the ladder. You’re almost done! Just avoid the Big Eye, and go through the door. Go up the ladder after the door, and avoid the electric traps for two screens. Then, boss time. Boss Fight: Elecman: He’s electrifying! He will 1. Jump around 2. Shoot out this electric beam that takes away ⅓ of your health O.o Yea… try to avoid the electricity. Having the higher ground helps. You can use the buster, or you can use the Rolling Cutter, which takes away ⅓ of his health. Use the Rolling Cutter, (and if you don’t have it, this will be a very hard battle). You go the Thunder Beam! The Thunder Beam shoots in three different directions: up, down, and across. It’s very helpful, and it’s arguably the best special weapon in the game. Iceman is weak to it, so we’re going to Iceman next. Iceman’s Stage: Ice everywhere O.O. And so, there are ice physics ;-;. To the right will be a new enemy called the “Crazy Razy”. It is very crazy, as in it will try to run into you. If you destroy the body, it’s head will fly up and attack you from above (shooting the head once before just destroys it, so do that). There will be quite a few of them here, so just shoot the head to make everything easier. After that will be water O.O. Water is very special. You can jump HIGHER in it :V (not very high in this game, tho ;-; ). However that works. Anyways, in the water will be some Spines, and a new enemy called the “Peng”. They move up and down, trying to run into you. After you get out of the water, there will be a hole with Octopus Batteries blocking a health container to the left. Just shoot them down if you need it. Now go down the hole to the right, aaand we’re stuck (with a Spine). Yep, you need to use the disappearing blocks ;w;. Or if you have the Magnet Beam, you can get past wayyy easier. If you’re jumping on the blocks, get rid of the Spine first with the Rolling Cutter. Anyways, first jump on the lowest disappearing block. Then when the second one to the left appears, wait a little then jump to the right. You will land on the third disappearing block (avoid the second one). Then jump to the fourth one to the right. When the fifth appears, wait, and then jump to the left. You will land on the sixth. Then just jump on the seventh block, and then jump to the left to finish the section. Fall down in the hole to the left. Yep, it’s another one of those disappearing block puzzles. Get rid of the Spine, then do this if you’re gonna do the disappearing block puzzle. First, jump on the lowest block to the right. Then jump to the left. Then jump to the left again. Now try to jump to the left to the next block, since it’s pretty far apart. When the next set of blocks appear, jump to the right. You will land on another block. Then jump straight up, to land on the block right above, then jump to the right and then to solid ground. *sighs* now it’s the hard part of the stage. These enemies in the sky are called “Foot Holder”. You can stand on them, they shoot bullets horizontally, and they move randomly. You are supposed to use them to get across a bottomless pit. NOPE. I’m not doing that, and neither should you. So instead use the Magnet Beam. Make sure to get the weapon energy in the middle! At the end of this segment, go down the hole to the right (and get the extra life if you so desire). Hole left if you want the goodies to the left on the next screen, then fall down the hole to the left. There will be a Big Eye, and then the door (this level is realllly short <.<). In the door will be a lot of Pengs. Destroy them all, then go through the door to Iceman. Boss Fight: Iceman: Well, attacks. 1. Jump and shoot out pieces of ice that take away ⅓ of your health, just like Elecman’s electricity attack. Well, try to jump in between the pieces of ice (the lag will make it easier to dodge XP), and shoot the Thunder Beam at him. He will be destroyed very quickly. You got the Ice Slasher from Iceman! It’s a piece of ice. It doesn’t damage enemies or bosses (with a few exceptions), but it can freeze them :V. The only Robot Master left is Fireman, and he is also weak to the Ice Slasher. Fireman’s Stage: Fire and lava. You will start off… somewhere You can freeze the fire tower temporally with the Ice Slasher, though. Proceed to the ladder, and go up it. Now go up the ladders to get past this screen, or freeze the fire towers to get the health containers. Now go to the right at the top of the ladder, avoiding more fire towers. Aaand now there’s a new hazard, the fire flamethrowers or whatever. Just, avoid them and proceed onwards. After avoiding flamethrowers and fire towers, you will come to a ladder (with health containers next to it). Go down it. There will be more fire towers and Tackle Fires! Go down the ladder to the left. Drop down onto the platform with the fire tower (without falling down into the lava <.<). Now go across the platforms, avoiding the Tackle Fires and NOT falling down into the lava. Go up the very last ladder to the right. Oh boy… the fire whatever room. Now either TRY to avoid the fire from the tube or whatever, or just use the Magnet Beam. Now go up the next ladder. There will be the Killer Bullets and the Spines. Go down the ladders, and proceed to the right (get the big weapon energy container if you need it). Jump over the pits of fire, looking out for the Tackle Fires. Then, there’s the door, with fire towers in front of it. There will be Screw Bombers on the ceiling inside, so just avoid them. Then, boss time. Boss Fight: Fireman: This is possibly the hardest boss with the weakness. He will 1. Walk around <.< 2. Shoot out this fire attack. Sometimes once, sometimes several times in a row. The catch is, there will be a speck of fire on the ground where you jumped over the fire attack. So yea, if you have the Ice Slasher, the best thing you can do is spam it. If not, then hope that you avoid the fire attack AND not land on the speck of fire on the floor. You now have the Fire Storm! You will shoot out a wave of fire, and you will have a fire shield when you shoot it out as well :3. Next Robot Master is… there ARE no other Robot Masters :V. Welp, it’s time to go get Dr. Wily. Dr. Wily’s Stage 1: Time to get the evil mastermind (time for the annoying sound from his flying saucer or whatever it is and the eyebrows!). Anyways, first off is OMG A BIG EYE! Yep, and not only one, but THREE Big Eyes :V. Um, try to freeze them in the air with the Ice Slasher then go under them… after that part are some blocks that you need the Super Arm to go through. Now there will be fire towers that move up and down. Use the Ice Slasher to freeze them (try to freeze them when they are barely out of the place. Basically, go as low as you can to freeze them) On the next screen will be spikes. Completely go up the ladder, then drop down to the second platform. Jump to the third, then jump to the ladder and climb up it. On top of the ladder will be Fleas. Get rid of them. Then go to the right. To continue in the stage, get rid of the blocks to the bottom with the Super Arm (do the top one if you want health). On the next screen, go left to fall down to the next level, then jump over the spikes to these small platforms. A Killer Bullet will be going through that section, so be careful. Drop down to the third level, then go to the left and go down the ladder. There’s the Foot Holder section *sighs*. And there are spikes on the ceiling and floor as well. Just use the Magnet Beam to get across. There are two weapon energy containers right before the ladder. Get them, and go up. You NEED the Magnet Beam to go past this part O.o. You have to make platforms to get through the room. If you run out of weapon energy, then you can go down the ladder for some more weapon energy (the containers respawn). After you go up the ladder, go to the right for a boss. Boss Fight: Yellow Devil: OH NO IT’S THAT BOSS! First thing that happens is that there will be yellow blobs coming at you from the left side of the screen! Jump over the ones that you can’t just avoid by standing still, and yea. When the Yellow Devil is a whole, it will reveal it’s eye and shoot a pellet at you. Shoot the Thunder Beam into the eye. Rinse and repeat. What makes this boss so hard is that the yellow blobs move so quickly. Welp, after you beat it comes the second level. Note: In the NES version, there’s a “pause glitch”. Basically when you shoot the Thunder beam, you pause. The hitting code or whatever is reset, so it hits the Yellow Devil multiple times. Dr. Wily Stage 2: Yep, outside now. You will face Bladers. And more Bladers. With bottomless pits :V. And then, you will go inside, and fall down a hole O.o. CUTMAN!!! Yep, you gotta fight Cutman again. And you can’t use his weakness either (there are no blocks in the room). Oh well, Cutman’s pretty easy anyways. After that, fall down the invisible hole to the left, and proceed onwards. There will be Screw Bombers. Avoid their shoots, and fall down the next invisible pit. You will face Elecman, so use the Rolling Cutter against him. After you beat Elecman, fall down the invisible pit. Now, there will be BOMBOMBS :V. So yea, avoid the little bombs and just be careful. After that part will be a ladder. Go down the ladder. You will see Octopus Batteries. Shoot them, or avoid them (use the Thunder Beam if you want to destroy them since the beam goes BELOW you :3). After three screens of them will be a screen with four Beaks. Use the Thunder Beam. The next screen has Octopus Batteries AND a Beak. Use the Thunder beam, then. The next screen will have the boss. Boss Fight: Copy Megaman: You are fighting YOURSELF :V. Basically, whatever weapon you have equipped, the copy will also equip, and use that said weapon. The best weapon to use is either the Fire Storm or the Thunder Beam, because you have a decent amount of each, and the copy likes to jump over your attacks, making it’s attacks miss you (if you stand and don’t jump). Anyways, best fought on a full bar of health. Dr. Wily Stage 3: You’re in the sewers O.o. Anyways, there will be Octopus Batteries. The next screen will have more Octopus Batteries, with a Screw Bomber. The next two screens will have the same thing. Just drop down and take the hits. The next section, you will go to the right, and water will come and push you to the right. You will face Pengs, then Killer Bullets in this tunnel. Shoot rapidly to kill them all, and collect the goodies you will get. After that, boss time (such a short level :’)) Boss Fight: CWU-01P: Such a confusing name… anyways, it will go around the room, shooting out little bubbles. It’s weakness is the Super Arm (hence the blocks in the room), but DON’T use the block yet. There isn’t enough to kill the boss completely with just the weakness, and you want the blocks for the later stages of the fight. You keep on shooting it until the big bubble pops. Everytime it pops, the boss will get a little faster. Pop the bubble three time, then use the blocks for the final few stages, since it’s gonna be really fast at the end. After that, the final level awaits. Dr. Wily Stage FINAL: You start off in a room, where there will be spikes and Watchers. Go up the ladder, and fight more Watchers. At the top of the ladder, use the Super Arm to get rid of the blocks. Go to the right. There will be a passageway with GUTSMAN STATUES IN THE CEILING, and Screw Bombers. Avoid the Screw Bombers. After that will be ladders, and the contraption from Gutsman’s Stage again ;-;. Just use the Magnet Beam to get across. Go BELOW the platform that you need to go to. Why? An extra life, and the super rare item (there’s only one in the entire game) known as the Yashichi. The Yashichi will refill ALL your health AND weapon energy. Very helpful. Now get up the ladder, and go into the teleporter. You will fight these bosses in this order. Bombman (weakness is Fire Storm), Fireman (weakness is Ice Slasher), Iceman (weakness is Thunder Beam), and at last, Dr. Wily’s favorite, Gutsman (weakness is Hyper Bomb). After that rush of bosses will be an empty room, with a big weapon energy container right next to the door. Fill up Fire Storm, and go into the room. FINAL Boss Fight: Dr. Wily Stage 1 of 2: Welp, final boss time. Dr. Wily will move left and right, and he will shoot out these pellets that goes in an arc. Avoid them, and use the Fire Storm on him to destroy it quite quickly. Then, the last phase begins. FINAL Boss Fight: Dr. Wily Stage 2 of 2: Final phase time. This time, there are no weaknesses, but the Rolling Cutter can do the most damage via doing multiple hits in one go. Well, Dr. Wily will shoot out a big ball of energy, and to avoid it you must try to get far away from it, and then jump over. After you beat this phase, you have beat the game. Now the credits roll, Dr. Wily is beaten, peace, and all that good stuff. END OF GUIDE |
Vizzed Elite
Affected by 'Laziness Syndrome'
Registered: 11-30-14
Location: depression land
Last Post: 1558 days
Last Active: 428 days
| Zt is dead |
Affected by 'Laziness Syndrome'
Registered: 11-30-14
Location: depression land
Last Post: 1558 days
Last Active: 428 days
(edited by ZeroTails on 06-16-15 01:57 PM) Post Rating: 11 Liked By: Bintsy, Eniitan, greenluigi, juuldude, Laian, no 8120, Pacman+Mariofan, sonicthehedgehog57, TornadoMudkip, Uzar, Zlinqx,
06-16-15 10:56 AM
ZeroTails is Offline
| ID: 1176521 | 31 Words
ZeroTails is Offline
| ID: 1176521 | 31 Words
ZeroTails
Cool Davideo7
Cool Davideo7
Level: 90
POSTS: 667/2465
POST EXP: 215125
LVL EXP: 7185589
CP: 18922.4
VIZ: 400242
POSTS: 667/2465
POST EXP: 215125
LVL EXP: 7185589
CP: 18922.4
VIZ: 400242
Likes: 0 Dislikes: 0
Welp, summons :3. Eniitan : sonicthehedgehog57 : greenluigi : A user of this : Zlinqx : Laian : PacmanandMariofan : juuldude : If you don't want to be summoned, then sorry :/. And if I forgot anyone... sorry ;-;. Eniitan : sonicthehedgehog57 : greenluigi : A user of this : Zlinqx : Laian : PacmanandMariofan : juuldude : If you don't want to be summoned, then sorry :/. And if I forgot anyone... sorry ;-;. |
Vizzed Elite
Affected by 'Laziness Syndrome'
Registered: 11-30-14
Location: depression land
Last Post: 1558 days
Last Active: 428 days
| Zt is dead |
Affected by 'Laziness Syndrome'
Registered: 11-30-14
Location: depression land
Last Post: 1558 days
Last Active: 428 days
06-16-15 11:36 AM
 Pacman+Mariofan is Offline
| ID: 1176523 | 77 Words
Pacman+Mariofan is Offline
| ID: 1176523 | 77 Words
 Pacman+Mariofan is Offline
| ID: 1176523 | 77 Words
PacmanandMariofan
Level: 165

POSTS: 5052/9337
POST EXP: 662200
LVL EXP: 58582445
CP: 38398.8
VIZ: 1566370

POSTS: 5052/9337
POST EXP: 662200
LVL EXP: 58582445
CP: 38398.8
VIZ: 1566370
Likes: 0 Dislikes: 0
Speaking of references, I like the Mario references you made in this guide. The bombomb one was super obvious to me This guide is incredible. You covered every jump, every attack, and every dodge (apparently. I haven't played Mega Man before XD)! You also made this guide very long but still pretty interesting. Once again, you did a great job with the pictures! I'm looking forward to seeing your next guide Speaking of references, I like the Mario references you made in this guide. The bombomb one was super obvious to me This guide is incredible. You covered every jump, every attack, and every dodge (apparently. I haven't played Mega Man before XD)! You also made this guide very long but still pretty interesting. Once again, you did a great job with the pictures! I'm looking forward to seeing your next guide |
Vizzed Elite
2-Time VCS Winner
Affected by 'Laziness Syndrome'
Registered: 10-22-12
Location: The Milky Way (not the candy)
Last Post: 969 days
Last Active: 969 days
2-Time VCS Winner
| Philippians 4:6-7 |
Affected by 'Laziness Syndrome'
Registered: 10-22-12
Location: The Milky Way (not the candy)
Last Post: 969 days
Last Active: 969 days
06-16-15 11:47 AM
ZeroTails is Offline
| ID: 1176530 | 85 Words
ZeroTails is Offline
| ID: 1176530 | 85 Words
ZeroTails
Cool Davideo7
Cool Davideo7
Level: 90
POSTS: 668/2465
POST EXP: 215125
LVL EXP: 7185589
CP: 18922.4
VIZ: 400242
POSTS: 668/2465
POST EXP: 215125
LVL EXP: 7185589
CP: 18922.4
VIZ: 400242
Likes: 0 Dislikes: 0
PacmanandMariofan : Yea... the Bombomb reference was like the best one XD. Well, about me covering EVERYTHING, that's just how I am :p. I do that for pretty much every guide I write, and my guides become super long, and generally pretty long for the game :p. (and then I have to take breaks because I'm so worn out). And I make it interesting because that's how I am :V. Also... I just noticed something. My guide was the 666th post I ever made. O.o AHHHHHHH! Well, about me covering EVERYTHING, that's just how I am :p. I do that for pretty much every guide I write, and my guides become super long, and generally pretty long for the game :p. (and then I have to take breaks because I'm so worn out). And I make it interesting because that's how I am :V. Also... I just noticed something. My guide was the 666th post I ever made. O.o AHHHHHHH! |
Vizzed Elite
Affected by 'Laziness Syndrome'
Registered: 11-30-14
Location: depression land
Last Post: 1558 days
Last Active: 428 days
| Zt is dead |
Affected by 'Laziness Syndrome'
Registered: 11-30-14
Location: depression land
Last Post: 1558 days
Last Active: 428 days
06-16-15 11:51 AM
Pacman+Mariofan is Offline
| ID: 1176531 | 62 Words
Pacman+Mariofan is Offline
| ID: 1176531 | 62 Words
PacmanandMariofan
Level: 165
POSTS: 5055/9337
POST EXP: 662200
LVL EXP: 58582445
CP: 38398.8
VIZ: 1566370
POSTS: 5055/9337
POST EXP: 662200
LVL EXP: 58582445
CP: 38398.8
VIZ: 1566370
Likes: 0 Dislikes: 0
Well, it's a good thing, so don't worry about it! As long as it doesn't make you get burned out on guides, it's fine. I noticed that too, but I didn't want to point it out and get punched by the air or something I noticed that too, but I didn't want to point it out and get punched by the air or something |
Vizzed Elite
2-Time VCS Winner
Affected by 'Laziness Syndrome'
Registered: 10-22-12
Location: The Milky Way (not the candy)
Last Post: 969 days
Last Active: 969 days
2-Time VCS Winner
| Philippians 4:6-7 |
Affected by 'Laziness Syndrome'
Registered: 10-22-12
Location: The Milky Way (not the candy)
Last Post: 969 days
Last Active: 969 days
(edited by PacmanandMariofan on 06-16-15 11:53 AM)
06-16-15 01:49 PM
sonicthehedgehog57 is Offline
| ID: 1176544 | 83 Words
| ID: 1176544 | 83 Words
Level: 69
POSTS: 910/1185
POST EXP: 342082
LVL EXP: 2857247
CP: 43443.7
VIZ: 54126

POSTS: 910/1185
POST EXP: 342082
LVL EXP: 2857247
CP: 43443.7
VIZ: 54126
Likes: 1 Dislikes: 0
ZeroTails : Super walkthrough making........ZEROTAILS!!! Super Entertaining.....ZEROTAILS!!! Ok enough reference for now dun dun dun dun ZEROOOTAAAAAILS!! XP Ok enough reference for now dun dun dun dun ZEROOOTAAAAAILS!! XP |
Vizzed Elite
Affected by 'Laziness Syndrome'
Registered: 12-02-10
Location: Springfield, MO
Last Post: 552 days
Last Active: 186 days
Affected by 'Laziness Syndrome'
Registered: 12-02-10
Location: Springfield, MO
Last Post: 552 days
Last Active: 186 days
Post Rating: 1 Liked By: ZeroTails,
