Forum Links
Play Mega Man X Online
Thread Information
Thread Actions
Order
Mega Man X Walkthrough Part 2
Game's Ratings
Overall
Graphics
Sound
Addictiveness
Depth
Story
Difficulty
Average User Score
9.2
9.4
9.2
8.9
8.2
7.8
7.1
02-23-15 11:07 AM
 ZeroTails is Offline
| ID: 1140247 | 1786 Words
 ZeroTails is Offline
| ID: 1140247 | 1786 Words
ZeroTails
Cool Davideo7
Cool Davideo7
Level: 90


POSTS: 221/2465
POST EXP: 215125
LVL EXP: 7180468
CP: 18922.4
VIZ: 400242

POSTS: 221/2465
POST EXP: 215125
LVL EXP: 7180468
CP: 18922.4
VIZ: 400242

Likes: 2 Dislikes: 0
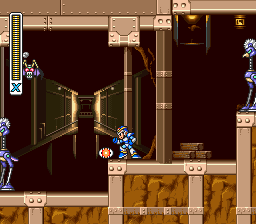
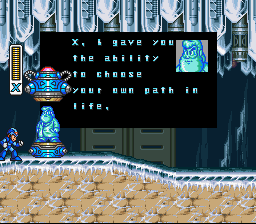
This is part 2 Part 1: https://www.vizzed.com/boards/thread.php?id=84353 Part 3: https://www.vizzed.com/boards/thread.php?id=85146 Part Final: https://www.vizzed.com/boards/thread.php?id=85187 Flame Mammoth's Stage: Well, when you go right, you will see a conveyor belt, with a “Scrap Robo” being dropped from the tube thing. The Scrap Robo likes to stay on the conveyor belt and shoot out a blue laser. Just shoot it down, like you have to the other enemies. Sometimes the tube thing likes to drop some scrap metal, that doesn't do anything. Take care of it the same way you would a Scrap Robo. You may notice that the floor is frozen. That is because you beat Chill Penguin. Basically, there is a stage gimmick. If you beat a certain maverick, another maverick’s stage will be changed. So, since you beat Chill Penguin, Flame Mammoth’s stage has ice instead of lava. There are two conveyor belts, and after that part is a Sky Claw for no apparent reason. Then there will be another conveyor belt, only this time it’s slanted. Amazing. Also, another Sky Claw. Then you will see a vertical hallway, with a health container on the right side of it. Now go down that hallway and jump on the first platform above the ice (or lava, if you didn’t beat Chill Penguin). There are these weird blocks above you to the left. You can break them with the helmet upgrade! This is literally the only use for the helmet upgrade. Dash jump to the block (may take a few tries) and break the blocks. Dr. Light will give you a new buster! You have one extra charge (it’s pink), which does more damage, and you can charge special weapons.  Now you will face a H̶a̶m̶m̶e̶r̶ ̶B̶r̶o̶ “Dig Labour”. It throws pickaxes. A supercharged pink shot can one-shot it. There will be lots of platforms with lots of Dig Labours. Before you go on, though, let’s walk on the ice! Eventually you will see a Heart Tank! Pick it up.  Get back on the platform above you, and wall jump to the right to get out of this place. Jump up the vertical hallway, and proceed. It’s the same part with the Scrap Robos so… suddenly, a crusher! Crushers can crush you, which is an insta-kill. Walking to the right (or cheating and walking on the ice) should allow you to avoid being crushed. Drop down the vertical hallway. You should see something red dropping from a red spot on the ceiling. That is lava, and it hurts. Try your best to avoid the drops. You will see a “Rolling Gabyool” This enemy is invincible, so avoid it the best you can. It spins on the tubes you are standing on. Getting on the top tube (via ladder) should be the easiest way to bypass. It’s a Hoganmer again, so dispatch it. After another Hoganmer, will be the lava drops and the Rolling Gabyools again. Go on the top tube, and destroy any Hoganmers you may encounter. You should be at the before-the-boss-is-a-hallway door. Equip Storm Eagle’s weapon, the Storm Tornado (because it’s his weakness), and walk through the door. Boss Fight: Flame Mammoth: This fight takes place on a conveyor belt. Flame Mammoth will change the direction the conveyor belt will go once in a while. He jumps. If you are on the ground when he jumps, you will be stunned for a while. Don’t worry if that happens. Flame Mammoth won't do anything. He will shoot fire at you, but the fire is easily avoidable. Just jump over the fire, or dash away from the fire. He may shoot oil, then some fire. If the fire hits the oil, the oil will catch fire. Um, avoid the oil if that happens. If he constantly jumps at the wall you are jumping at (if you are wall jumping to avoid attacks) then dash jump over his head. This fight is easy, especially if you have the Storm Tornado. Now you have the Fire Wave. This is a simple flamethrower that becomes useful in certain situations. We would go to Spark Mandrill first, but we can now get a Heart Tank in Chill Penguin! Item collection for the win! Item collection #1: After the ride armor section, get up the ledge above you, by dash jumping from the ledge to the right of it. You will see an igloo. Take the Fire Wave, and use it on the igloo. The igloo should break, leaving you with... weapon energy. Use the Fire Wave on the next igloo, and that should give you a Heart Tank.  Now use the Escape Unit. The Escape Unit allows you to leave any stage you have already beaten. Now for Spark Mandrill. Spark Mandrill’s Stage: You will start off in a power plant type area. The first enemy you encounter is a Gun Volt. You may notice that the stage will go dark then light again. That’s because we beat Storm Eagle. It’s an annoying gimmick, but it doesn't make the stage impossible. This whole part of the stage has Gun Volts. Go up the ladder, then go up the other ladder, ignoring the bottom ladder (we can’t do anything down that ladder yet). Now go right, climbing ladders when you need to. Now is the part with… things that give off light. They are called “Hotarions”. They will try to crash into you, but they can only go in a straight line. They also appear at pre-destined spots. Just rapidly shoot while you are platforming and you should be fine. Also, there are Flammingles here. You should reach a ladder. Go down the ladder, and equips Storm Tornado. This is the mini-boss, Thunder Slimer. Two super-charged Storm Tornado attacks should destroy it. To the right of the mini-boss is, a new enemy called the “Rush Roader”. They will try to run into you. A supercharged pink shot tears right through them, though. Also, a green shot will have them wobble a bit. The Lift Cannons also return, but now they aren’t on rising platforms! So innovative. After a while, there will be these enemies called a “Mega Tortoise”. They are big, hence the name “Mega” and they will shoot out parachutes with explosives attached to them. A pink shot should do wonders. See that Heart Tank up there? You can get there one of two ways. First way is to dash jump off the wall, and get on that little ledge. This is the hardest of the two, but it saves you some backtracking. The second way is to come back with Boomer Kuwanger’s weapon, then use the grabbing function of the weapon to get the Heart Tank. Either way, you have a Heart Tank now. After some ladders, Rush Roaders, and Mega Tortoises, there will be another section with the Hotarions. Same rules apply, but now there are Ball De Vouxes instead of Flammingles. Now, you are at the boss door. Equip Shotgun Ice, and fight the maverick boss. Boss Fight: Spark Mandrill: This fight is insanely easy with Shotgun Ice. Just use the weapon, wait for the invulnerability period to wear off, then shoot him again. You should be fine. However, he does have some attacks to be wary of. He has an attack where he punches the ground and electric sparks appear. Jump over them, because they also run up the walls. He can hang off the ceiling, and jump down on you. Dash under him. He will dash at you as well. Wall jump up a wall to avoid that. You now have the Electric Spark! This is an electricity based attack that has you shoot… electric sparks. Next maverick will be Armored Armadillo! We are halfway done with the maverick line-up! Yay! Armored Armadillo’s Stage: Well, right next to you is a… car thingy that you can hop on and ride in. Get on it. There will be Batton Bones and Flammingles. After a while, the car thingy will be going down a pit. Jump off. Proceed on right, killing the Batton Bones and Flammingles. See that pit? Equip the Fire Wave and wall slide down. See that big enemy destroying the walls and ground? That is called the “Mole Borer”. The Fire Wave is really effective against it. Wait until it passes you, then get off the wall and use the Fire Wave. After a while, the Mole Borer will get destroyed. Go left where the Mole Borer was, and you will see another Sub Tank! Pick it up.  Now go right, killing the Batton Bones and the Metools, and break that wall with your head that you will eventually see. There are two health containers, useful for filling up your Sub Tanks. Next up is.. a pit of spikes! Spikes are insta-kill, so jump over the pit. After some more Metools and Batton Bones, there will be another spike pit. Guess what? The Spikeys make a return. After some more spike pits, will be the car thingy again. Get on it. Then get off when it starts going down a spike pit. See that big pit? Equip the Fire Wave again, and destroy the Mole Borer you will encounter. Go on right, and you will see a Heart Tank! Grab it.  After some more spikes will be the car thingy again. Get on it. You will see a bird enemy, called a “Metal Wing”. One shot is all it takes to bring it down. Dash jump to the right when you are outside for a little bit. See that ledge with the heart container? That ledge will become important sometime in the future. For now, just go into the boss door, equipping the Electric Spark. Boss Fight: Armored Armadillo: First off, he has a shell covering his body. Use the Electric Spark to get rid of it. He has an attack where he curls up into a ball, and bounces around. He can’t be hurt while he’s doing the attack, unless you use the Electric Spark to break his shell. Try to avoid that attack as best as you can. I tend to wall jump on a wall, in a specific pattern. He hits the lower corner of the left side of the stage first, then the top corner on the left. I hug the wall accordingly.He also fakes out of rolling into a ball sometimes. Just get down and shot him. He also shoots energy beam things at you. Wall jump to avoid it. This is one of the harder mavericks to fight, even with his weakness. Now you have the Rolling Shield! You shoot out a… rolling shield. Who is weak to the Rolling Shield? Launch Octopus! Let’s go there next! In the next part. Part 1: https://www.vizzed.com/boards/thread.php?id=84353 Part 3: https://www.vizzed.com/boards/thread.php?id=85146 Part Final: https://www.vizzed.com/boards/thread.php?id=85187 Flame Mammoth's Stage: Well, when you go right, you will see a conveyor belt, with a “Scrap Robo” being dropped from the tube thing. The Scrap Robo likes to stay on the conveyor belt and shoot out a blue laser. Just shoot it down, like you have to the other enemies. Sometimes the tube thing likes to drop some scrap metal, that doesn't do anything. Take care of it the same way you would a Scrap Robo. You may notice that the floor is frozen. That is because you beat Chill Penguin. Basically, there is a stage gimmick. If you beat a certain maverick, another maverick’s stage will be changed. So, since you beat Chill Penguin, Flame Mammoth’s stage has ice instead of lava. There are two conveyor belts, and after that part is a Sky Claw for no apparent reason. Then there will be another conveyor belt, only this time it’s slanted. Amazing. Also, another Sky Claw. Then you will see a vertical hallway, with a health container on the right side of it. Now go down that hallway and jump on the first platform above the ice (or lava, if you didn’t beat Chill Penguin). There are these weird blocks above you to the left. You can break them with the helmet upgrade! This is literally the only use for the helmet upgrade. Dash jump to the block (may take a few tries) and break the blocks. Dr. Light will give you a new buster! You have one extra charge (it’s pink), which does more damage, and you can charge special weapons.  Now you will face a H̶a̶m̶m̶e̶r̶ ̶B̶r̶o̶ “Dig Labour”. It throws pickaxes. A supercharged pink shot can one-shot it. There will be lots of platforms with lots of Dig Labours. Before you go on, though, let’s walk on the ice! Eventually you will see a Heart Tank! Pick it up.  Get back on the platform above you, and wall jump to the right to get out of this place. Jump up the vertical hallway, and proceed. It’s the same part with the Scrap Robos so… suddenly, a crusher! Crushers can crush you, which is an insta-kill. Walking to the right (or cheating and walking on the ice) should allow you to avoid being crushed. Drop down the vertical hallway. You should see something red dropping from a red spot on the ceiling. That is lava, and it hurts. Try your best to avoid the drops. You will see a “Rolling Gabyool” This enemy is invincible, so avoid it the best you can. It spins on the tubes you are standing on. Getting on the top tube (via ladder) should be the easiest way to bypass. It’s a Hoganmer again, so dispatch it. After another Hoganmer, will be the lava drops and the Rolling Gabyools again. Go on the top tube, and destroy any Hoganmers you may encounter. You should be at the before-the-boss-is-a-hallway door. Equip Storm Eagle’s weapon, the Storm Tornado (because it’s his weakness), and walk through the door. Boss Fight: Flame Mammoth: This fight takes place on a conveyor belt. Flame Mammoth will change the direction the conveyor belt will go once in a while. He jumps. If you are on the ground when he jumps, you will be stunned for a while. Don’t worry if that happens. Flame Mammoth won't do anything. He will shoot fire at you, but the fire is easily avoidable. Just jump over the fire, or dash away from the fire. He may shoot oil, then some fire. If the fire hits the oil, the oil will catch fire. Um, avoid the oil if that happens. If he constantly jumps at the wall you are jumping at (if you are wall jumping to avoid attacks) then dash jump over his head. This fight is easy, especially if you have the Storm Tornado. Now you have the Fire Wave. This is a simple flamethrower that becomes useful in certain situations. We would go to Spark Mandrill first, but we can now get a Heart Tank in Chill Penguin! Item collection for the win! Item collection #1: After the ride armor section, get up the ledge above you, by dash jumping from the ledge to the right of it. You will see an igloo. Take the Fire Wave, and use it on the igloo. The igloo should break, leaving you with... weapon energy. Use the Fire Wave on the next igloo, and that should give you a Heart Tank.  Now use the Escape Unit. The Escape Unit allows you to leave any stage you have already beaten. Now for Spark Mandrill. Spark Mandrill’s Stage: You will start off in a power plant type area. The first enemy you encounter is a Gun Volt. You may notice that the stage will go dark then light again. That’s because we beat Storm Eagle. It’s an annoying gimmick, but it doesn't make the stage impossible. This whole part of the stage has Gun Volts. Go up the ladder, then go up the other ladder, ignoring the bottom ladder (we can’t do anything down that ladder yet). Now go right, climbing ladders when you need to. Now is the part with… things that give off light. They are called “Hotarions”. They will try to crash into you, but they can only go in a straight line. They also appear at pre-destined spots. Just rapidly shoot while you are platforming and you should be fine. Also, there are Flammingles here. You should reach a ladder. Go down the ladder, and equips Storm Tornado. This is the mini-boss, Thunder Slimer. Two super-charged Storm Tornado attacks should destroy it. To the right of the mini-boss is, a new enemy called the “Rush Roader”. They will try to run into you. A supercharged pink shot tears right through them, though. Also, a green shot will have them wobble a bit. The Lift Cannons also return, but now they aren’t on rising platforms! So innovative. After a while, there will be these enemies called a “Mega Tortoise”. They are big, hence the name “Mega” and they will shoot out parachutes with explosives attached to them. A pink shot should do wonders. See that Heart Tank up there? You can get there one of two ways. First way is to dash jump off the wall, and get on that little ledge. This is the hardest of the two, but it saves you some backtracking. The second way is to come back with Boomer Kuwanger’s weapon, then use the grabbing function of the weapon to get the Heart Tank. Either way, you have a Heart Tank now. After some ladders, Rush Roaders, and Mega Tortoises, there will be another section with the Hotarions. Same rules apply, but now there are Ball De Vouxes instead of Flammingles. Now, you are at the boss door. Equip Shotgun Ice, and fight the maverick boss. Boss Fight: Spark Mandrill: This fight is insanely easy with Shotgun Ice. Just use the weapon, wait for the invulnerability period to wear off, then shoot him again. You should be fine. However, he does have some attacks to be wary of. He has an attack where he punches the ground and electric sparks appear. Jump over them, because they also run up the walls. He can hang off the ceiling, and jump down on you. Dash under him. He will dash at you as well. Wall jump up a wall to avoid that. You now have the Electric Spark! This is an electricity based attack that has you shoot… electric sparks. Next maverick will be Armored Armadillo! We are halfway done with the maverick line-up! Yay! Armored Armadillo’s Stage: Well, right next to you is a… car thingy that you can hop on and ride in. Get on it. There will be Batton Bones and Flammingles. After a while, the car thingy will be going down a pit. Jump off. Proceed on right, killing the Batton Bones and Flammingles. See that pit? Equip the Fire Wave and wall slide down. See that big enemy destroying the walls and ground? That is called the “Mole Borer”. The Fire Wave is really effective against it. Wait until it passes you, then get off the wall and use the Fire Wave. After a while, the Mole Borer will get destroyed. Go left where the Mole Borer was, and you will see another Sub Tank! Pick it up.  Now go right, killing the Batton Bones and the Metools, and break that wall with your head that you will eventually see. There are two health containers, useful for filling up your Sub Tanks. Next up is.. a pit of spikes! Spikes are insta-kill, so jump over the pit. After some more Metools and Batton Bones, there will be another spike pit. Guess what? The Spikeys make a return. After some more spike pits, will be the car thingy again. Get on it. Then get off when it starts going down a spike pit. See that big pit? Equip the Fire Wave again, and destroy the Mole Borer you will encounter. Go on right, and you will see a Heart Tank! Grab it.  After some more spikes will be the car thingy again. Get on it. You will see a bird enemy, called a “Metal Wing”. One shot is all it takes to bring it down. Dash jump to the right when you are outside for a little bit. See that ledge with the heart container? That ledge will become important sometime in the future. For now, just go into the boss door, equipping the Electric Spark. Boss Fight: Armored Armadillo: First off, he has a shell covering his body. Use the Electric Spark to get rid of it. He has an attack where he curls up into a ball, and bounces around. He can’t be hurt while he’s doing the attack, unless you use the Electric Spark to break his shell. Try to avoid that attack as best as you can. I tend to wall jump on a wall, in a specific pattern. He hits the lower corner of the left side of the stage first, then the top corner on the left. I hug the wall accordingly.He also fakes out of rolling into a ball sometimes. Just get down and shot him. He also shoots energy beam things at you. Wall jump to avoid it. This is one of the harder mavericks to fight, even with his weakness. Now you have the Rolling Shield! You shoot out a… rolling shield. Who is weak to the Rolling Shield? Launch Octopus! Let’s go there next! In the next part. |
Vizzed Elite
Affected by 'Laziness Syndrome'
Registered: 11-30-14
Location: depression land
Last Post: 1554 days
Last Active: 423 days
| Zt is dead |
Affected by 'Laziness Syndrome'
Registered: 11-30-14
Location: depression land
Last Post: 1554 days
Last Active: 423 days


 User Notice


