

 User Notice
 Forum Links

Thread Information
Views
1,311
Replies
1
Rating
0
Status
OPEN
Thread
Creator
Creator
EX Palen
07-10-14 07:40 PM
07-10-14 07:40 PM
Last
Post
Post
steel_attacker
07-11-14 02:07 AM
07-11-14 02:07 AM
System
9.1
Views: 915
Today: 0
Users: 3 unique
Today: 0
Users: 3 unique
Thread Actions


Order
Pokemon Pinball: Ruby & Sapphire Walkthrough
Game's Ratings
Overall
Graphics
Sound
Addictiveness
Depth
Story
Difficulty
Average User Score
9.1
8.9
8.6
8.5
7.8
4
5.8
07-10-14 07:40 PM
 EX Palen is Offline
| ID: 1048408 | 2097 Words
EX Palen is Offline
| ID: 1048408 | 2097 Words
 EX Palen is Offline
| ID: 1048408 | 2097 Words
EX Palen
Spanish Davideo7
Spanish Davideo7
Level: 137


POSTS: 60/6185
POST EXP: 1096058
LVL EXP: 30645460
CP: 188065.3
VIZ: 10671966

POSTS: 60/6185
POST EXP: 1096058
LVL EXP: 30645460
CP: 188065.3
VIZ: 10671966
Likes: 0 Dislikes: 0
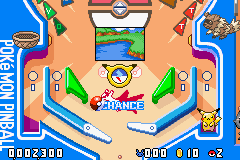
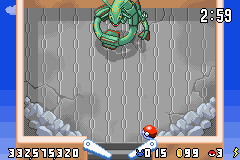
For once in a lot of time, a pinball game has another purpose besides getting the highest possible score. Nearly 400 Pokemon await to be caught in two different boards. Think you can catch them all? General Each board has its own unique set of features, locations and Pokemon, but some things are shared in common by both boards. The lower part of both boards features a central image of the location you are in right now. Above it, there is a special hole that opens under circumstances explained later. Below the picture, there are three lights. Catching/Hatching a Pokemon lights up one, while evolving counts as two. Once all three lights are on, the hole above the image will open to grant access to the bonus stage displayed in the image. Going down a little more, we find the inner lanes heading to the flippers, while the outer two bypass the flippers, losing the ball. Pikachu protects one side, and can deflect a ball that falls onto it if the Pika Charger, located in the right loop in both boards, is flipped to its maximum capacity. Each of this lanes also has a light, with a letter on it. Each time the ball passes through the lane, the letter lights up, until the word HOLE can be read. At this time, or when the mode you are in right now ends, the central hole will open, leading to the Slots. In the Slots, many goodies can be earned, ranging from bonus points to special events. On the upper part of the board, above the bumpers, there are three more lights. These lights represent the Ball Upgrade, and when all three are on, your Pokeball will turn into a Super Ball, then an Ultra Ball and finally the Master Ball. Contrary to the common games, the Ball Upgrades only serve for bonus multiplier: 2 for the Super Ball, 3 for Ultra Ball and 4 for Master Ball. The upgrade lasts for about 60 seconds before fading off. As a last reminder, you get an Extra Ball when you catch 15 Pokemon in any possible method. The number of Pokemon caught is displayed in the bottom right corner, next to the number of coins and balls remaining. Another Extra Ball can be purchased in the Market. Ruby Board Descr Catch ‘em Mode: To start Catch ‘em Mode, first you need at least two lights on the right loop active. Send the ball through the right loop to do this. Once done, send the ball into Sharpedo, and the catch can start. The silhouette of the Pokemon will appear on the central image, and can be revealed by hitting the bumpers three times. Once revealed, the Pokemon will appear, with the word CATCH! below it. Hit the Pokemon three more times to light up the whole word, and you will catch it. Egg Hatch Mode: The fourth time the ball is sent through the Hatch Lane, the egg will hatch. The hatched Pokemon will roam the board for a while. To catch it, just hit it twice. Send the ball into the Hatch Lane again so you can repeat the process. EVO Mode: To start EVO Mode, all three lights on the left loop must be active. Send the ball into the left loop three times, and you will see the Market changing into Pokemon Center. Send the ball into it to check the Pokemon you’ve caught up until now, and choose which one to evolve. Once Travel Mode: As explained above, you need to hit the left Linoone three times when its head is out. After this, Travel Mode will start. Send the ball through either the right or left loop, and the hole will open. Send the ball into it and you will be given the option to travel. Your location only affects the Catch ‘em Mode and has no influence on the Pokemon that hatch from eggs. Bonus Stages: This board has two unique bonus stages, plus a third one shared with the other board. The first is the Kecleon Stage, the second is the Groudon Stage and the third is the Rayquaza Stage. I will not detail how to beat each stage. The only thing I’ll say about it is that you need at least 10 hits to beat Kecleon and 15 to beat Groudon and Rayquaza. Also, the second time you play the Groudon and Rayquaza Stages in the same game, if you complete the stage, you will catch them. The Bonus Stage cycle is as follows: Kecleon-Groudon-Kecleon-Groudon-Rayquaza Essentially, before facing Rayquaza for the first time you will have captured Groudon. Complete the cycle for the second time and you will capture Rayquaza. If you don’t manage to complete a Bonus Stage, although only proved in Rayquaza’s case, the cycle doesn’t advance, so you will be stuck on that stage until you beat it. Special: On the Ruby Board you have the chance to catch 5 unique Pokemon: Latios, Chikorita, Cyndaquil, Totodile and Aerodactyl. They can appear in any location, but they are extremely rare to find. Compare it to find a shiny Pokemon. Also, neither Chikorita, Cyndaquil or Totodile can evolve. Sapphire Board Catch ‘em Mode: As in the Ruby Board, you need at least two lights from the right loop active to start this mode. Once you accomplish this, send the ball into the Wailmer in the right side, this will trigger the mode. Again, the silhouette of the Pokemon appears, and once the bumpers are hit three times, the Pokemon reveals itself, with the word CATCH! below it. Three hits on the Pokemon light up the whole word, catching the Pokemon. Egg Hatch Mode: The Hatch Lane is located below the Wailmer. Send the ball through it three times to light up the “nest”, and the fourth time, the egg shall hatch. The hatched Pokemon will go down the metallic path to the board, and roam for about 45 seconds. Two hits on it and you will catch it. Send the ball through the Hatch Lane once more and the machine will place a new egg in the “nest”. EVO Mode: As in the Ruby Board, you need all three lights on the left loop active. The third time the ball is sent through the left loop, you will see the Market’s screen changing into EVO, and Plusle and Minun will both lower the electrical field. Send the ball into the structure, so you can Travel Mode: Hit the switch on the left wall until three Seedot are in the nest. Once the mode is started, send the ball through either the right or left loop, and the hole will open. Hit the ball into it, and you will be given the option to travel. Again, remember that location only changes the available Pokemon in Catch ‘em Mode. Bonus Stages: There are three bonus stages, two unique to this board. The Bonus Stages are the Duskull Stage, the Kyogre Stage and the Rayquaza stage. The Duskull Stage is different than the rest of stages. First, you have to hit 20 Duskull, and after that, Dusclops will appear. Dusclops is done in 5 hits. Kyogre and Rayquaza need at least 15 hits. Again, Kyogre can be captured if you clear the stage for the second time in the same game, and the same applies for Rayquaza. The Bonus Stage cycle is also the same that appears in the other board: Duskull-Kyogre-Duskull-Kyogre-Rayquaza Again, remember that, at least in Rayquaza’s case, if you fail to beat a Bonus Stage, the cycle won’t advance, and you will replay the stage until you clear it. Special: There’s a chance, although very low, that Latias can appear in any location in Catch ‘em Mode. What about the Regis? There are a random number of locations you can go through Travel Mode. Some locations are unique to a board, while others are shared, like the ruins. Once you travel enough times, not below 5 times, you can end in this special location. You’ll notice this location for the moon towering above some kind of cave in its image. If you start Catch ‘em Mode in here, you can find Regirock, Regice, Registeel and Beldum, the latter being able to evolve into Metang and Metagross. Also, if you happen to activate the Slots, you can hit a special bonus called “Jirachi’s arrival”. This will make Jirachi appear on the board for 30 seconds. It won’t stay still, but won’t move as often as a hatched Pokemon, and is also bigger. Hit it three times within the time limit and you will catch it. Seems there’s not enough time, but you will see for yourself that even 30 seconds is more than enough. General Each board has its own unique set of features, locations and Pokemon, but some things are shared in common by both boards. The lower part of both boards features a central image of the location you are in right now. Above it, there is a special hole that opens under circumstances explained later. Below the picture, there are three lights. Catching/Hatching a Pokemon lights up one, while evolving counts as two. Once all three lights are on, the hole above the image will open to grant access to the bonus stage displayed in the image. Going down a little more, we find the inner lanes heading to the flippers, while the outer two bypass the flippers, losing the ball. Pikachu protects one side, and can deflect a ball that falls onto it if the Pika Charger, located in the right loop in both boards, is flipped to its maximum capacity. Each of this lanes also has a light, with a letter on it. Each time the ball passes through the lane, the letter lights up, until the word HOLE can be read. At this time, or when the mode you are in right now ends, the central hole will open, leading to the Slots. In the Slots, many goodies can be earned, ranging from bonus points to special events. On the upper part of the board, above the bumpers, there are three more lights. These lights represent the Ball Upgrade, and when all three are on, your Pokeball will turn into a Super Ball, then an Ultra Ball and finally the Master Ball. Contrary to the common games, the Ball Upgrades only serve for bonus multiplier: 2 for the Super Ball, 3 for Ultra Ball and 4 for Master Ball. The upgrade lasts for about 60 seconds before fading off. As a last reminder, you get an Extra Ball when you catch 15 Pokemon in any possible method. The number of Pokemon caught is displayed in the bottom right corner, next to the number of coins and balls remaining. Another Extra Ball can be purchased in the Market. Ruby Board Descr Catch ‘em Mode: To start Catch ‘em Mode, first you need at least two lights on the right loop active. Send the ball through the right loop to do this. Once done, send the ball into Sharpedo, and the catch can start. The silhouette of the Pokemon will appear on the central image, and can be revealed by hitting the bumpers three times. Once revealed, the Pokemon will appear, with the word CATCH! below it. Hit the Pokemon three more times to light up the whole word, and you will catch it. Egg Hatch Mode: The fourth time the ball is sent through the Hatch Lane, the egg will hatch. The hatched Pokemon will roam the board for a while. To catch it, just hit it twice. Send the ball into the Hatch Lane again so you can repeat the process. EVO Mode: To start EVO Mode, all three lights on the left loop must be active. Send the ball into the left loop three times, and you will see the Market changing into Pokemon Center. Send the ball into it to check the Pokemon you’ve caught up until now, and choose which one to evolve. Once Travel Mode: As explained above, you need to hit the left Linoone three times when its head is out. After this, Travel Mode will start. Send the ball through either the right or left loop, and the hole will open. Send the ball into it and you will be given the option to travel. Your location only affects the Catch ‘em Mode and has no influence on the Pokemon that hatch from eggs. Bonus Stages: This board has two unique bonus stages, plus a third one shared with the other board. The first is the Kecleon Stage, the second is the Groudon Stage and the third is the Rayquaza Stage. I will not detail how to beat each stage. The only thing I’ll say about it is that you need at least 10 hits to beat Kecleon and 15 to beat Groudon and Rayquaza. Also, the second time you play the Groudon and Rayquaza Stages in the same game, if you complete the stage, you will catch them. The Bonus Stage cycle is as follows: Kecleon-Groudon-Kecleon-Groudon-Rayquaza Essentially, before facing Rayquaza for the first time you will have captured Groudon. Complete the cycle for the second time and you will capture Rayquaza. If you don’t manage to complete a Bonus Stage, although only proved in Rayquaza’s case, the cycle doesn’t advance, so you will be stuck on that stage until you beat it. Special: On the Ruby Board you have the chance to catch 5 unique Pokemon: Latios, Chikorita, Cyndaquil, Totodile and Aerodactyl. They can appear in any location, but they are extremely rare to find. Compare it to find a shiny Pokemon. Also, neither Chikorita, Cyndaquil or Totodile can evolve. Sapphire Board Catch ‘em Mode: As in the Ruby Board, you need at least two lights from the right loop active to start this mode. Once you accomplish this, send the ball into the Wailmer in the right side, this will trigger the mode. Again, the silhouette of the Pokemon appears, and once the bumpers are hit three times, the Pokemon reveals itself, with the word CATCH! below it. Three hits on the Pokemon light up the whole word, catching the Pokemon. Egg Hatch Mode: The Hatch Lane is located below the Wailmer. Send the ball through it three times to light up the “nest”, and the fourth time, the egg shall hatch. The hatched Pokemon will go down the metallic path to the board, and roam for about 45 seconds. Two hits on it and you will catch it. Send the ball through the Hatch Lane once more and the machine will place a new egg in the “nest”. EVO Mode: As in the Ruby Board, you need all three lights on the left loop active. The third time the ball is sent through the left loop, you will see the Market’s screen changing into EVO, and Plusle and Minun will both lower the electrical field. Send the ball into the structure, so you can Travel Mode: Hit the switch on the left wall until three Seedot are in the nest. Once the mode is started, send the ball through either the right or left loop, and the hole will open. Hit the ball into it, and you will be given the option to travel. Again, remember that location only changes the available Pokemon in Catch ‘em Mode. Bonus Stages: There are three bonus stages, two unique to this board. The Bonus Stages are the Duskull Stage, the Kyogre Stage and the Rayquaza stage. The Duskull Stage is different than the rest of stages. First, you have to hit 20 Duskull, and after that, Dusclops will appear. Dusclops is done in 5 hits. Kyogre and Rayquaza need at least 15 hits. Again, Kyogre can be captured if you clear the stage for the second time in the same game, and the same applies for Rayquaza. The Bonus Stage cycle is also the same that appears in the other board: Duskull-Kyogre-Duskull-Kyogre-Rayquaza Again, remember that, at least in Rayquaza’s case, if you fail to beat a Bonus Stage, the cycle won’t advance, and you will replay the stage until you clear it. Special: There’s a chance, although very low, that Latias can appear in any location in Catch ‘em Mode. What about the Regis? There are a random number of locations you can go through Travel Mode. Some locations are unique to a board, while others are shared, like the ruins. Once you travel enough times, not below 5 times, you can end in this special location. You’ll notice this location for the moon towering above some kind of cave in its image. If you start Catch ‘em Mode in here, you can find Regirock, Regice, Registeel and Beldum, the latter being able to evolve into Metang and Metagross. Also, if you happen to activate the Slots, you can hit a special bonus called “Jirachi’s arrival”. This will make Jirachi appear on the board for 30 seconds. It won’t stay still, but won’t move as often as a hatched Pokemon, and is also bigger. Hit it three times within the time limit and you will catch it. Seems there’s not enough time, but you will see for yourself that even 30 seconds is more than enough. |
Administrator
Site Staff Manager, Content Writer, Console Manager
Affected by 'Laziness Syndrome'
Registered: 07-03-13
Location: Barcelona, Spain
Last Post: 3 days
Last Active: 7 hours
Site Staff Manager, Content Writer, Console Manager
| Vizzed #1 Hardstyle fan |
Affected by 'Laziness Syndrome'
Registered: 07-03-13
Location: Barcelona, Spain
Last Post: 3 days
Last Active: 7 hours
07-11-14 02:07 AM
steel_attacker is Offline
| ID: 1048528 | 33 Words
| ID: 1048528 | 33 Words
steel_attacker
Level: 69

POSTS: 772/1281
POST EXP: 43985
LVL EXP: 2861741
CP: 2459.4
VIZ: 74704

POSTS: 772/1281
POST EXP: 43985
LVL EXP: 2861741
CP: 2459.4
VIZ: 74704
Likes: 0 Dislikes: 0
Nice walkthrough! Seems specific and I think I'll use this when I play Pokémon Pinball: Ruby & Sapphire. By the way, any way to access the Duskull stage? I've never been there before. Nice walkthrough! Seems specific and I think I'll use this when I play Pokémon Pinball: Ruby & Sapphire. By the way, any way to access the Duskull stage? I've never been there before. |
Trusted Member
Affected by 'Laziness Syndrome'
Registered: 09-15-13
Location: In the moment
Last Post: 3073 days
Last Active: 848 days
Affected by 'Laziness Syndrome'
Registered: 09-15-13
Location: In the moment
Last Post: 3073 days
Last Active: 848 days
