

 User Notice
 Forum Links
Guide: Mega Man X3 Walthrough
Guide to Mega Man X3 (SNES Version)
Guide to Mega Man X3 (SNES Version)
Play Mega Man X3 Online


Thread Information
Views
46
Replies
0
Rating
0
Status
OPEN
Thread
Creator
Creator
tornadocam
01-27-24 09:27 AM
01-27-24 09:27 AM
Last
Post
Post
tornadocam
01-27-24 09:27 AM
01-27-24 09:27 AM
System
9.4
Views: 40
Today: 0
Users: 2 unique
Today: 0
Users: 2 unique
Thread Actions


Order
Mega Man X3 Walthrough
Game's Ratings
Overall
Graphics
Sound
Addictiveness
Depth
Story
Difficulty
Average User Score
9.4
10
9.3
8.3
10
8.3
8.7
01-27-24 09:27 AM
tornadocam is Offline
| ID: 1407220 | 4324 Words
| ID: 1407220 | 4324 Words
tornadocam
Level: 103


POSTS: 3089/3122
POST EXP: 781784
LVL EXP: 11399583
CP: 61424.1
VIZ: 4876874

POSTS: 3089/3122
POST EXP: 781784
LVL EXP: 11399583
CP: 61424.1
VIZ: 4876874
Likes: 0 Dislikes: 0
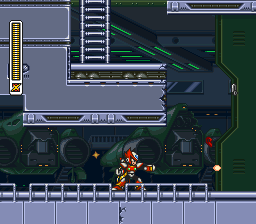
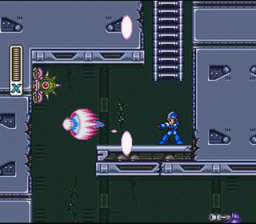
Yesterday I did a review of the original Mega Man X3 for SNES. In my review I stated how X3 was one of my favorite X games in the X series. Today I decided I would do a walk through of one of my favorite games. The game starts off with the story. You can press start if you want to skip it. I cover the story more in my review. You will be taken to the intro stage. Zero and X will meet and discuss the mission. You start off controlling X. The best way to clear out the enemies is use charge shots and take them out. Just continue to head right and then down the ladder. You will be taken to another room. Mac a former hunter will talk to X before doing a cheap shot. There is no way to avoid the shot. X will be carried away. Zero will drop in from the ceiling. Charge Zero's shots and you can use his powerful saber. Beware of the falling ceiling parts. You will then go have to climb the wall. Beware though there is an enemy at top dropping spike balls. After the enemy drops the spike ball jump to the opposite side. You will then see a door gate. Before entering I charge Zero's Saber before heading in. Its time to battle Mac. Zero's Saber cuts right through him. Now you have X back. Head out the gate and climb up (no worries about enemies here) Then its mini boss time. The best way to deal with the intro stage mini boss is used charged shots and hit the head. However, he can use his spike balls to destroy the ground and hit you. Keep using charged shots and dodge. He will go down. Now you have completed the first stage. This is the boss order I usually do. Understand this is just me. If a boss is giving you a hard time try the next one until you find the right one. Blizzard Buffalo Toxic Seahorse Tunnel Rhino Volt Catfish Crush Crawfish Neon Tiger Gravity Beetle Blast Hornet Blizzard Buffalo Stage (one of my favorites) This stage has awesome music and the frozen city is a nice touch. Beware this stage as ice in it. You will slide. If you start to slide Jump. Anyway, head to the right and watch the death spikes. Use charged shots to take out the enemies. Avoid more spikes and head upward. You will then see a platform you cannot use this unless you have found the armor. You will notice Ice blocks (You will have to revisit this stage with the correct weapon) You can use the ride armor to bust the blocks or you can use the drill weapon. Head down and avoid the spikes to get you a heart tank. Then head back upward. Used charged shots to take out the enemies. Eventually you will head down to the gate this is the halfway point. Head right and watch the ice. You will then head down. Keep your buster charged as you will see ice rock enemies that come from the ceiling charged shots take them out quickly. You will see a ladder. You can head down the wall and it will lead you to Vile's Room You have to defeat two bosses to activate Vile's Room. I do not recommend fighting Vile until only 1 maverick is left. I will explain why in my section on Vile. This is the best way to get to Vile, so that is why I put it in here. Otherwise climb the ladder and take out the enemies. You will need to climb another ladder. You will then entire the final area. Take out the enemies and take the upper path. When it seems like you reached the end. Do a fast dash Jump to get to the upper room above the boss gate. If you miss you can take the lower path just take out the enemies again. Eventually you will get the first power up in this game. Dr. Light's capsule is there to get the dash boots upgrade. Instead of heading down to Blizzard Buffalo's gate. Go back to the start of this area. You probably noticed an e tank flashing. Use the new dash boots to dash upward to get it. Then repeat. Blizzard Buffalo-His weakness is the Parasite Bomb, but you really do not need it. The best way to deal with Blizzard Buffalo is to fire a charged shot Clime the wall than dash over him and repeat. Do not let him get off screen as he will fire frost shield spikes at you. When you hear a laser like sound climb the wall quickly as he is about to shoot a wall of ice at you. Just keep blasting him and dashing over him. He will go down and you now have frost shield. Toxic Seahorse- Head right you can fight the giant enemies or just dash over them. If you fight them charged shots is the best. Just keep heading right and then head down. Then you head right you will come to a pit. You can Jump to the other side with a jump dash or you can dash straight upward it doesn't matter. Keep climbing the walls but watch out for enemies. You want to eventually climb all the way up on the left side. The left side leads to a heart tank. Then just head back down and go right. You will be taken to the first gate this is the halfway point. Head Right to a platform if you have found the P suit you can use it as its for underwater. The P suit can destroy the fans creating the current. If not just head down into the water. You will see a lot of turtle enemies destroy the turtles with charged shots. You can take the upper Path. When you find X's charged shot upgrade. Use the Frost Shield Charge to create an iceberg it will float on top. Float Upward and get another armor suit. Its the Spike punch suit as I like to call it. Then head back down and take out the enemies. Also watch for death spikes. You will then fight the mini boss. Charged shots destroys the mini boss quickly. You will then head up and as the water drains you will be able to move upward. Just continue to move upward and you will reach Toxic Seahorse. Toxic Seahorse- He is weak to Frost Shield. Hit him with Frost Shield to lock him in a pattern and continue to hit him. He will go down and you will get Acid burst also known as Acid Bubble. Cut scene time Dr. Doppler will summon the nightmare police Bit and Byte. Bit will appear at the next stages half way mark. Byte will appear after 6 bosses are defeated. He will also summon Vile. Then its on to the game. Vile's factory Okay I'm just going to go ahead and put his section here. Do not fight Vile until only Blast Hornet is left. Head back to Buffalo's stage and remember how I said the capsule takes you to Vile. You will be taken to an old factory. Just take out the enemies. If Blast Hornet is the only maverick left alive. The elevators will work Just ride the elevator it protects you from the falling trash. Vile has two phases in his battle. The first phase he is in his ride armor. Use Ray Splasher or charged shots. If you climb the wall and he hits it you will come down. What I like to do is use charged shots climb the wall then dash over him. His Ride armor will be destroyed. The second phase is the actual battle. Ray Splasher quickly takes out Vile killing him for good. Just avoid his fireballs and bullets and he will go down. But he has set the factory to self destruct. You only have 60 seconds to escape. This is why Blast Hornet should be the only boss alive. Used Charged shots to take out the enemies. Ride the Elevator to the top take out more enemies and jump back into the portal to escape. After the cut scene you will now be back to the stage select screen. Tunnel Rhino The stage starts off with enemies that will drop boulders on you slide under the boulders. Then the enemies will fall to the ground trying to fire missiles at you. You can not even fight these enemies once you dash under them. Then enter the mine and head down. Avoid the pits and use charged shots to take out the enemies. As you head upward you will see a room to the right. You will need to the Triad Thunder and the buster upgrade. Charge the Triad Thunder up and it will send a boulder crashing on the spikes. Then you can get the heart tank. Chances are you will not have the triad thunder yet don't worry you can revisit. Head upward then right. Watch the mud falling from the ceiling and clear out the enemies. Head up then right once you reach the next area continue the right. Before heading down the space/ladder climb up to get an Energy Tank. Then head down and take out the enemies. Not some of the enemies shots will get bigger if you start charging so beware of that. You meet the first check point. After defeating two Mavericks Bit will be waiting for you. The best way to deal with him is use Frost Shield on him. He has a plasma shot that can trap you. He can also use his saber. Frost Shield not only defeats him but it kills him for good. Yeah if you don't kill him you have to fight him again which is a pain so save yourself some time and kill him for good. Then head right tank out the tank enemies but beware after you defeat them their drill missiles will still fire out after you have defeated them. Now you have to watch out for falling boulders as you move upward. You will notice a bolder hanging to your left. Use Triad Thunder Charged to send it crashing down. This leads to X helmet upgrade. Then head back down. Again if you don't have the thunder weapon you can revisit. Head right and take out the enemies. Make your way down and its mini boss time. The best way to deal with this boss is to only climb the wall halfway and keep firing charged shots. The boss when it hits the wall you will fall down. If you climb all the way up to the wall the boss will separate itself and attack itself to the ceiling trying to hit you with more spikes. After defeating it head right. Clear out the enemies head right and then upward Tunnel Rhino- Rhino is weak to the acid burst. He will fire drill missiles at you. If your on the wall he will try to knock you down. Acid Burst locks him into a pattern. Hit him with it climb the wall, dash over him, and hit him again. Keep repeating this and he goes down quickly. You get Tornado Fang Volt Catfish You are now in a Power Plant. Head right dash through the lasers to avoid damage. Also watch out for the enemies on the ceiling as they will fire electric spheres at you. The platform leads to Vile so avoid that as I stated its best to fight him later. Do not jump on the platform used a charged shot to take out the missile enemy. Head right and continue to dash through the laser lights. Ride the elevator or just climb the wall the choice is yours. Beware the very top of the ceiling has death spikes you will need to jump to the area heading left to avoid getting poked. Head left and dodge the lasers and take out the enemies. Head upward and then right. You have another elevator ride this one close to the top. Jump right there is a heart tank waiting for you. Avoid the spikes and if you do die you still get the heart tank. Head all the way back down to ride the elevator now go to the left. (You will need to ride the elevator past the get off point to get the heart tank as its farther up) Deal with the enemies then head upward you will notice another room to the left with a weird platform. Charge the gravity weapon up when you get it to ride it to the top. The armor upgrade is there. If you don't have the gravity weapon yet you can revisit. Head back down and go right. Head back down and go right to the check point. Head right then up. You will see another armor platform. Choose any one then jump down. The weight of the armor will cause the floor to crash this leads to an energy tank. Then you can head back up and continue into the power plant. Beware of the floating electric spheres on the wall. Just dodge them and follow the layout. You will come to the boss door Volt Catfish- Do not fight this guy unless you have his weakness which is Tornado Fang. His electric attacks are powerful and they pack a serious punch. He is also quick too. However, Tornado Fang stops him in his tracks. After you hit him with a drill be ready to fire another one. He is quick and powerful and its easy to loose the pattern. Just keep hitting him with drills and he goes down. You get Triad Thunder. Crush Crawfish Head right on top of the cranes after the second crane head down. Use the Charged Triad Thunder to break the platform. This leads to a ride armor suit. Climb up and head left if you want to use the ride armor. I recommend using the ride armor even the classic ride armor or the spike punch one. Then head right. You will see a heavy armor enemy fall down. Use the ride armor to jump right. You will see a crack in the wall. Use a ride armor to smash it. This leads to the heart tank. After that head down to fight the heavy armor enemy. Charged shots work best on it. If you still have the ride armor use it to smash it to pieces. Keep heading right to the firs gate. This is the check point or boss battle. If your following my order nobody should be here. After the gate head right. Take out the enemies head right then down. You will see a huge gap. Use a dash jump to proceed Head down take out the enemies then avoid the spikes. You will be taken to a funny room the game does the work for you. Then head upward again taking out the enemies. Its tile to battle Crawfish. Crush Crawfish has a powerful attack with his pincher claws. To end this fight quickly use Triad Thunder. That is his weakness. Using the thunder weapon he goes down quick. You get spinning blade. Neon Tiger THis the jungle stage and another one of my favorites. The dragon fly enemies will try to drop bombs on you. But, you can also ride the dragon fly enemies by getting on their back. Best way to avoid them for now and head right. You will reach a wall climb up and take out the enemies. Now you can ride a dragonfly enemy to get an energy tank. Head to the other wall climb up. Then go right again clearing out the enemies. You will notice a different colored block in the wall with a crack. Use the drill weapon to break it. This is the buster upgrade. You will need the dash boots to get it though and avoid the spikes at the bottom. Next head out of the upgrade room and continue downward. You will reach the gate its miniboss time. The centipede like boss is weak to the Triad Thunder use this to end this fight quickly. Frost Shield also ends the fight quickly. Head right after winning. Then upward you will see another ride armor platform you can use it if you want to clear out the enemies. Then its to another gate. Byte could show up here. If he does keep your distance and blast him with the drill weapon. Sometimes its best to hit him with the drill weapon. Climb the wall right before he fires a mine into the wall (these will knock you down) dash over him and repeat. To save yourself a lot of pain the drill weapon kills him for good. After the gate head down then right clearing out the enemies toward the end ride a dragonfly to the top of the wall that is the heart tank. Then fall down clear out more enemies and its boss time. Neon Tiger do not fight this guy unless you have the spinning blade weapon. Tiger is very fast and powerful. The spinning blade locks him into a pattern but beware he will still use his fast attacks on you. It is easy to loose the pattern with this guy. Keep using spinning blade on him and you get Ray Splasher. Gravity Beetle Head right and as you go into the room. You will notice a heart tank to the left. Blast Hornet has to be defeated to get the heart tank. Again you can revisit even before the fortress stages. Take out the enemies and head to the right and climb the ladder. You will be taken to a gate. This is were Byte could show up so see how to deal with him above. Climb the ladder then climb to the wall to the left. Use the dash boots to grab a ride armor suit program. Then head back to the right clearing out all the enemies. Head down and then right. Its time to ride an elevator again. Just clear out the enemies on each section of the wall shooting at you. Just ride the elevator to the get off point. You can climb the wall to get a armor platform. However, I find the armor slows you down so don't bother. Instead go right and move quickly as the bullet platform will fall once you step on them, just like the doughnut blocks in the Mario Games. Head right quickly then climb the tower to the boss gate. Gravity Bettle- Despite being slow this guy has some powerful attacks. He can use his horn to try to gore you and his gravity weapon can do damage. Use Ray Splasher to take him down quickly. You get Gravity Well after defeating him. Blast Hornet- Before I begin you will need to visit this stage probably after defeating Tunnel Rhino there is an armor program in here. The other armor programs will not work until you get this one. Once you get, kill yourself off. You will get a game over but you will maintain the item you just collected. Okay onto the stage. Head right and then ride the elevator to the top of the get off point. Continue to head right then down to the first gate. Its mini boss time. You will fight a laser spirograph like thing. The best weapon to use is Acid Burts 6-8 shots will end this fight quickly. Beware this boss can climb the walls and jump in a zig zag pattern that is why I recommend using the acid weapon to save you a lot of time. Head right and climb the warehouses. After the second warehourse you will notice blocks on top of a cracked beam. Destroy the blocks to head down. Use the drill weapon in the cracks in the wall. This leads to the armor suit I mentioned above. You cannot use the other ride armor suits until you get this one. If you have already gotten the armor suit you can skip this step and head right. Use the dash upgrade to dash upward to climb the wall for the heart tank. Then fall back down and head right. Head down and follow the pattern avoid the death spikes on the walls and in the pits. Also when you destroy blocks dash under them quick because they will keep falling on you. If you get crushed by one that is instant death. Its now boss time. Blast Hornet- He can be trouble without his weakness. He can send mini versions of himself to home in on you. He can stab you with his large stinger. Gravity Well keeps him from using these attacks. Use that weapon to end this fight quickly. After defeating 8 mavericks you will get another cut scene and a plot twist will occur. You will learn that it is Sigma behind all of this. Fortress Stage 1 Head right quickly clearing out the enemies then upward. Watch the spiked ceiling as spikes will drop down. Touch the spikes and its instant death. Then you will come up to moving walls. Clime these quickly to avoid getting crushed to death. Head left and then upward. You will enter a room with a collapsing ceiling. Zero will show up to activate the switch to slow the ceiling collapsing down. Leaving you to fight the enemy. Use a charged spinning blade attack to take down the enemy quickly. Then proceed to the right. Continue to the right then down then right again. You will notice a pit. Clime down the pit on the left side. The Golden Armor capsule is here waiting for you. The Golden Armor gives you all the extra power upgrades. X will be able to refill his energy by standing still use this to refill energy tanks, he will have the supper dash, hyper shot weapon, and the extra armor. This is a great armor to have and very useful. Climb out of the pit then head right and follow the layout watch for spike balls and enemies. Its boss time and its a strange thing with a long cannon of a nose. I seriously do not know what this thing is called or supposed to be. Use the platforms it drops to climb the wall and blast it with Ray Splasher it will go down eventually. Fortress Stage 2 Follow the layout and take out the enemies, but beware there is a lot of pits in this stage. Avoid the pits and carefully take out the enemies. You will reach a wall with different layouts use the dash upward move to make it to the first boss of this stage. The boss is an insect like boss. If you bring Zero here he will defeat it but he will get wounded as the boss will crash into him. You will get Zero's Saber while he leaves the game. However, this is not the good ending in this game. If you bring X to this fight there will be nothing here so proceed. Follow the layout taking out enemies and climbing the walls. Eventually you will reach spike walls with very slow moving snail like things riding them. Shoot the snail like things to reveal their platforms. Careful ride the snail robots on the spikes, take out the next snails shell to expose a platform and make your way up. This will take you several minutes as these things do not move very fast. Its boss time. If you have not defeated Vile this is where he would show up. If you have defeated Vile another strange like thing shows up. Use charged shots to win Fortress Stage 3 Nothing special here except its rematch time with the 8 mavericks. Use their weaknesses to win. Then its a fight with Dr. Doppler. Dr. Doppler is weak to the acid weapon. However, beware if he has his green shield up he will absorb your attack and refill his health. Dr. Doppler will then reveal that Sigma's true form is that of a computer virus and how he was infected. He tells X to destroy Sigma before he can use his new armor. Sigma Stage Nothing special here except for enemies. Just clear them out follow the layout to Sigma. Sigma Version 1- He is in his new armor with a shield. He basically throws bombs and fireballs at you. Use the spinning blade and dodge to win. Sigma Version 2 also known as Kasier Sigma- This is the hardest battle. Sigma's weak point is his small head. In the mean time he is firing missiles and lasers at you. Its best to climb the wall get a hit and dodge his attacks. When he fires his laser he will always hit the top corner of the wall. He will eventually go down. Sigma 3- Sigma reveals his true form this was seen in the final boss battle in Mega Man X2. His computer virus form will flood the room you just fought him in. Climb the wall quickly and do some dash jumps. Once you escape you will be taken to a dead in with now way out. Before Sigma can attack you the true and cannon ending is Zero will use a vaccine on his saber that Dr. Doppler gave him to defeat Sigma until the next game. Sigma will state his program is fading but someday he will be back. The credits roll and congratulations you have won and beat the game. This completes my walkthrough of one of the best X games in the series in my opinion. I hope this guide helps you master this game. The game starts off with the story. You can press start if you want to skip it. I cover the story more in my review. You will be taken to the intro stage. Zero and X will meet and discuss the mission. You start off controlling X. The best way to clear out the enemies is use charge shots and take them out. Just continue to head right and then down the ladder. You will be taken to another room. Mac a former hunter will talk to X before doing a cheap shot. There is no way to avoid the shot. X will be carried away. Zero will drop in from the ceiling. Charge Zero's shots and you can use his powerful saber. Beware of the falling ceiling parts. You will then go have to climb the wall. Beware though there is an enemy at top dropping spike balls. After the enemy drops the spike ball jump to the opposite side. You will then see a door gate. Before entering I charge Zero's Saber before heading in. Its time to battle Mac. Zero's Saber cuts right through him. Now you have X back. Head out the gate and climb up (no worries about enemies here) Then its mini boss time. The best way to deal with the intro stage mini boss is used charged shots and hit the head. However, he can use his spike balls to destroy the ground and hit you. Keep using charged shots and dodge. He will go down. Now you have completed the first stage. This is the boss order I usually do. Understand this is just me. If a boss is giving you a hard time try the next one until you find the right one. Blizzard Buffalo Toxic Seahorse Tunnel Rhino Volt Catfish Crush Crawfish Neon Tiger Gravity Beetle Blast Hornet Blizzard Buffalo Stage (one of my favorites) This stage has awesome music and the frozen city is a nice touch. Beware this stage as ice in it. You will slide. If you start to slide Jump. Anyway, head to the right and watch the death spikes. Use charged shots to take out the enemies. Avoid more spikes and head upward. You will then see a platform you cannot use this unless you have found the armor. You will notice Ice blocks (You will have to revisit this stage with the correct weapon) You can use the ride armor to bust the blocks or you can use the drill weapon. Head down and avoid the spikes to get you a heart tank. Then head back upward. Used charged shots to take out the enemies. Eventually you will head down to the gate this is the halfway point. Head right and watch the ice. You will then head down. Keep your buster charged as you will see ice rock enemies that come from the ceiling charged shots take them out quickly. You will see a ladder. You can head down the wall and it will lead you to Vile's Room You have to defeat two bosses to activate Vile's Room. I do not recommend fighting Vile until only 1 maverick is left. I will explain why in my section on Vile. This is the best way to get to Vile, so that is why I put it in here. Otherwise climb the ladder and take out the enemies. You will need to climb another ladder. You will then entire the final area. Take out the enemies and take the upper path. When it seems like you reached the end. Do a fast dash Jump to get to the upper room above the boss gate. If you miss you can take the lower path just take out the enemies again. Eventually you will get the first power up in this game. Dr. Light's capsule is there to get the dash boots upgrade. Instead of heading down to Blizzard Buffalo's gate. Go back to the start of this area. You probably noticed an e tank flashing. Use the new dash boots to dash upward to get it. Then repeat. Blizzard Buffalo-His weakness is the Parasite Bomb, but you really do not need it. The best way to deal with Blizzard Buffalo is to fire a charged shot Clime the wall than dash over him and repeat. Do not let him get off screen as he will fire frost shield spikes at you. When you hear a laser like sound climb the wall quickly as he is about to shoot a wall of ice at you. Just keep blasting him and dashing over him. He will go down and you now have frost shield. Toxic Seahorse- Head right you can fight the giant enemies or just dash over them. If you fight them charged shots is the best. Just keep heading right and then head down. Then you head right you will come to a pit. You can Jump to the other side with a jump dash or you can dash straight upward it doesn't matter. Keep climbing the walls but watch out for enemies. You want to eventually climb all the way up on the left side. The left side leads to a heart tank. Then just head back down and go right. You will be taken to the first gate this is the halfway point. Head Right to a platform if you have found the P suit you can use it as its for underwater. The P suit can destroy the fans creating the current. If not just head down into the water. You will see a lot of turtle enemies destroy the turtles with charged shots. You can take the upper Path. When you find X's charged shot upgrade. Use the Frost Shield Charge to create an iceberg it will float on top. Float Upward and get another armor suit. Its the Spike punch suit as I like to call it. Then head back down and take out the enemies. Also watch for death spikes. You will then fight the mini boss. Charged shots destroys the mini boss quickly. You will then head up and as the water drains you will be able to move upward. Just continue to move upward and you will reach Toxic Seahorse. Toxic Seahorse- He is weak to Frost Shield. Hit him with Frost Shield to lock him in a pattern and continue to hit him. He will go down and you will get Acid burst also known as Acid Bubble. Cut scene time Dr. Doppler will summon the nightmare police Bit and Byte. Bit will appear at the next stages half way mark. Byte will appear after 6 bosses are defeated. He will also summon Vile. Then its on to the game. Vile's factory Okay I'm just going to go ahead and put his section here. Do not fight Vile until only Blast Hornet is left. Head back to Buffalo's stage and remember how I said the capsule takes you to Vile. You will be taken to an old factory. Just take out the enemies. If Blast Hornet is the only maverick left alive. The elevators will work Just ride the elevator it protects you from the falling trash. Vile has two phases in his battle. The first phase he is in his ride armor. Use Ray Splasher or charged shots. If you climb the wall and he hits it you will come down. What I like to do is use charged shots climb the wall then dash over him. His Ride armor will be destroyed. The second phase is the actual battle. Ray Splasher quickly takes out Vile killing him for good. Just avoid his fireballs and bullets and he will go down. But he has set the factory to self destruct. You only have 60 seconds to escape. This is why Blast Hornet should be the only boss alive. Used Charged shots to take out the enemies. Ride the Elevator to the top take out more enemies and jump back into the portal to escape. After the cut scene you will now be back to the stage select screen. Tunnel Rhino The stage starts off with enemies that will drop boulders on you slide under the boulders. Then the enemies will fall to the ground trying to fire missiles at you. You can not even fight these enemies once you dash under them. Then enter the mine and head down. Avoid the pits and use charged shots to take out the enemies. As you head upward you will see a room to the right. You will need to the Triad Thunder and the buster upgrade. Charge the Triad Thunder up and it will send a boulder crashing on the spikes. Then you can get the heart tank. Chances are you will not have the triad thunder yet don't worry you can revisit. Head upward then right. Watch the mud falling from the ceiling and clear out the enemies. Head up then right once you reach the next area continue the right. Before heading down the space/ladder climb up to get an Energy Tank. Then head down and take out the enemies. Not some of the enemies shots will get bigger if you start charging so beware of that. You meet the first check point. After defeating two Mavericks Bit will be waiting for you. The best way to deal with him is use Frost Shield on him. He has a plasma shot that can trap you. He can also use his saber. Frost Shield not only defeats him but it kills him for good. Yeah if you don't kill him you have to fight him again which is a pain so save yourself some time and kill him for good. Then head right tank out the tank enemies but beware after you defeat them their drill missiles will still fire out after you have defeated them. Now you have to watch out for falling boulders as you move upward. You will notice a bolder hanging to your left. Use Triad Thunder Charged to send it crashing down. This leads to X helmet upgrade. Then head back down. Again if you don't have the thunder weapon you can revisit. Head right and take out the enemies. Make your way down and its mini boss time. The best way to deal with this boss is to only climb the wall halfway and keep firing charged shots. The boss when it hits the wall you will fall down. If you climb all the way up to the wall the boss will separate itself and attack itself to the ceiling trying to hit you with more spikes. After defeating it head right. Clear out the enemies head right and then upward Tunnel Rhino- Rhino is weak to the acid burst. He will fire drill missiles at you. If your on the wall he will try to knock you down. Acid Burst locks him into a pattern. Hit him with it climb the wall, dash over him, and hit him again. Keep repeating this and he goes down quickly. You get Tornado Fang Volt Catfish You are now in a Power Plant. Head right dash through the lasers to avoid damage. Also watch out for the enemies on the ceiling as they will fire electric spheres at you. The platform leads to Vile so avoid that as I stated its best to fight him later. Do not jump on the platform used a charged shot to take out the missile enemy. Head right and continue to dash through the laser lights. Ride the elevator or just climb the wall the choice is yours. Beware the very top of the ceiling has death spikes you will need to jump to the area heading left to avoid getting poked. Head left and dodge the lasers and take out the enemies. Head upward and then right. You have another elevator ride this one close to the top. Jump right there is a heart tank waiting for you. Avoid the spikes and if you do die you still get the heart tank. Head all the way back down to ride the elevator now go to the left. (You will need to ride the elevator past the get off point to get the heart tank as its farther up) Deal with the enemies then head upward you will notice another room to the left with a weird platform. Charge the gravity weapon up when you get it to ride it to the top. The armor upgrade is there. If you don't have the gravity weapon yet you can revisit. Head back down and go right. Head back down and go right to the check point. Head right then up. You will see another armor platform. Choose any one then jump down. The weight of the armor will cause the floor to crash this leads to an energy tank. Then you can head back up and continue into the power plant. Beware of the floating electric spheres on the wall. Just dodge them and follow the layout. You will come to the boss door Volt Catfish- Do not fight this guy unless you have his weakness which is Tornado Fang. His electric attacks are powerful and they pack a serious punch. He is also quick too. However, Tornado Fang stops him in his tracks. After you hit him with a drill be ready to fire another one. He is quick and powerful and its easy to loose the pattern. Just keep hitting him with drills and he goes down. You get Triad Thunder. Crush Crawfish Head right on top of the cranes after the second crane head down. Use the Charged Triad Thunder to break the platform. This leads to a ride armor suit. Climb up and head left if you want to use the ride armor. I recommend using the ride armor even the classic ride armor or the spike punch one. Then head right. You will see a heavy armor enemy fall down. Use the ride armor to jump right. You will see a crack in the wall. Use a ride armor to smash it. This leads to the heart tank. After that head down to fight the heavy armor enemy. Charged shots work best on it. If you still have the ride armor use it to smash it to pieces. Keep heading right to the firs gate. This is the check point or boss battle. If your following my order nobody should be here. After the gate head right. Take out the enemies head right then down. You will see a huge gap. Use a dash jump to proceed Head down take out the enemies then avoid the spikes. You will be taken to a funny room the game does the work for you. Then head upward again taking out the enemies. Its tile to battle Crawfish. Crush Crawfish has a powerful attack with his pincher claws. To end this fight quickly use Triad Thunder. That is his weakness. Using the thunder weapon he goes down quick. You get spinning blade. Neon Tiger THis the jungle stage and another one of my favorites. The dragon fly enemies will try to drop bombs on you. But, you can also ride the dragon fly enemies by getting on their back. Best way to avoid them for now and head right. You will reach a wall climb up and take out the enemies. Now you can ride a dragonfly enemy to get an energy tank. Head to the other wall climb up. Then go right again clearing out the enemies. You will notice a different colored block in the wall with a crack. Use the drill weapon to break it. This is the buster upgrade. You will need the dash boots to get it though and avoid the spikes at the bottom. Next head out of the upgrade room and continue downward. You will reach the gate its miniboss time. The centipede like boss is weak to the Triad Thunder use this to end this fight quickly. Frost Shield also ends the fight quickly. Head right after winning. Then upward you will see another ride armor platform you can use it if you want to clear out the enemies. Then its to another gate. Byte could show up here. If he does keep your distance and blast him with the drill weapon. Sometimes its best to hit him with the drill weapon. Climb the wall right before he fires a mine into the wall (these will knock you down) dash over him and repeat. To save yourself a lot of pain the drill weapon kills him for good. After the gate head down then right clearing out the enemies toward the end ride a dragonfly to the top of the wall that is the heart tank. Then fall down clear out more enemies and its boss time. Neon Tiger do not fight this guy unless you have the spinning blade weapon. Tiger is very fast and powerful. The spinning blade locks him into a pattern but beware he will still use his fast attacks on you. It is easy to loose the pattern with this guy. Keep using spinning blade on him and you get Ray Splasher. Gravity Beetle Head right and as you go into the room. You will notice a heart tank to the left. Blast Hornet has to be defeated to get the heart tank. Again you can revisit even before the fortress stages. Take out the enemies and head to the right and climb the ladder. You will be taken to a gate. This is were Byte could show up so see how to deal with him above. Climb the ladder then climb to the wall to the left. Use the dash boots to grab a ride armor suit program. Then head back to the right clearing out all the enemies. Head down and then right. Its time to ride an elevator again. Just clear out the enemies on each section of the wall shooting at you. Just ride the elevator to the get off point. You can climb the wall to get a armor platform. However, I find the armor slows you down so don't bother. Instead go right and move quickly as the bullet platform will fall once you step on them, just like the doughnut blocks in the Mario Games. Head right quickly then climb the tower to the boss gate. Gravity Bettle- Despite being slow this guy has some powerful attacks. He can use his horn to try to gore you and his gravity weapon can do damage. Use Ray Splasher to take him down quickly. You get Gravity Well after defeating him. Blast Hornet- Before I begin you will need to visit this stage probably after defeating Tunnel Rhino there is an armor program in here. The other armor programs will not work until you get this one. Once you get, kill yourself off. You will get a game over but you will maintain the item you just collected. Okay onto the stage. Head right and then ride the elevator to the top of the get off point. Continue to head right then down to the first gate. Its mini boss time. You will fight a laser spirograph like thing. The best weapon to use is Acid Burts 6-8 shots will end this fight quickly. Beware this boss can climb the walls and jump in a zig zag pattern that is why I recommend using the acid weapon to save you a lot of time. Head right and climb the warehouses. After the second warehourse you will notice blocks on top of a cracked beam. Destroy the blocks to head down. Use the drill weapon in the cracks in the wall. This leads to the armor suit I mentioned above. You cannot use the other ride armor suits until you get this one. If you have already gotten the armor suit you can skip this step and head right. Use the dash upgrade to dash upward to climb the wall for the heart tank. Then fall back down and head right. Head down and follow the pattern avoid the death spikes on the walls and in the pits. Also when you destroy blocks dash under them quick because they will keep falling on you. If you get crushed by one that is instant death. Its now boss time. Blast Hornet- He can be trouble without his weakness. He can send mini versions of himself to home in on you. He can stab you with his large stinger. Gravity Well keeps him from using these attacks. Use that weapon to end this fight quickly. After defeating 8 mavericks you will get another cut scene and a plot twist will occur. You will learn that it is Sigma behind all of this. Fortress Stage 1 Head right quickly clearing out the enemies then upward. Watch the spiked ceiling as spikes will drop down. Touch the spikes and its instant death. Then you will come up to moving walls. Clime these quickly to avoid getting crushed to death. Head left and then upward. You will enter a room with a collapsing ceiling. Zero will show up to activate the switch to slow the ceiling collapsing down. Leaving you to fight the enemy. Use a charged spinning blade attack to take down the enemy quickly. Then proceed to the right. Continue to the right then down then right again. You will notice a pit. Clime down the pit on the left side. The Golden Armor capsule is here waiting for you. The Golden Armor gives you all the extra power upgrades. X will be able to refill his energy by standing still use this to refill energy tanks, he will have the supper dash, hyper shot weapon, and the extra armor. This is a great armor to have and very useful. Climb out of the pit then head right and follow the layout watch for spike balls and enemies. Its boss time and its a strange thing with a long cannon of a nose. I seriously do not know what this thing is called or supposed to be. Use the platforms it drops to climb the wall and blast it with Ray Splasher it will go down eventually. Fortress Stage 2 Follow the layout and take out the enemies, but beware there is a lot of pits in this stage. Avoid the pits and carefully take out the enemies. You will reach a wall with different layouts use the dash upward move to make it to the first boss of this stage. The boss is an insect like boss. If you bring Zero here he will defeat it but he will get wounded as the boss will crash into him. You will get Zero's Saber while he leaves the game. However, this is not the good ending in this game. If you bring X to this fight there will be nothing here so proceed. Follow the layout taking out enemies and climbing the walls. Eventually you will reach spike walls with very slow moving snail like things riding them. Shoot the snail like things to reveal their platforms. Careful ride the snail robots on the spikes, take out the next snails shell to expose a platform and make your way up. This will take you several minutes as these things do not move very fast. Its boss time. If you have not defeated Vile this is where he would show up. If you have defeated Vile another strange like thing shows up. Use charged shots to win Fortress Stage 3 Nothing special here except its rematch time with the 8 mavericks. Use their weaknesses to win. Then its a fight with Dr. Doppler. Dr. Doppler is weak to the acid weapon. However, beware if he has his green shield up he will absorb your attack and refill his health. Dr. Doppler will then reveal that Sigma's true form is that of a computer virus and how he was infected. He tells X to destroy Sigma before he can use his new armor. Sigma Stage Nothing special here except for enemies. Just clear them out follow the layout to Sigma. Sigma Version 1- He is in his new armor with a shield. He basically throws bombs and fireballs at you. Use the spinning blade and dodge to win. Sigma Version 2 also known as Kasier Sigma- This is the hardest battle. Sigma's weak point is his small head. In the mean time he is firing missiles and lasers at you. Its best to climb the wall get a hit and dodge his attacks. When he fires his laser he will always hit the top corner of the wall. He will eventually go down. Sigma 3- Sigma reveals his true form this was seen in the final boss battle in Mega Man X2. His computer virus form will flood the room you just fought him in. Climb the wall quickly and do some dash jumps. Once you escape you will be taken to a dead in with now way out. Before Sigma can attack you the true and cannon ending is Zero will use a vaccine on his saber that Dr. Doppler gave him to defeat Sigma until the next game. Sigma will state his program is fading but someday he will be back. The credits roll and congratulations you have won and beat the game. This completes my walkthrough of one of the best X games in the series in my opinion. I hope this guide helps you master this game. |
Vizzed Elite
Affected by 'Laziness Syndrome'
Registered: 08-18-12
Last Post: 84 days
Last Active: 31 days
Affected by 'Laziness Syndrome'
Registered: 08-18-12
Last Post: 84 days
Last Active: 31 days
